Lesson 07: Create an ARM C Application with Keil μVision MDK-ARM
In this lesson, you will learn how to create a C/C++ language project with the basics of the Keil μVision MDK-ARM development system.
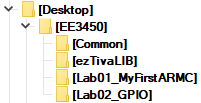
Create a folder named "EE3450" on your Windows desktop. Then create sub-folders inside the "EE3450" folder as the following structure:
EE3450
|
 |
You have to install the Keil μVisio and the drivers for the TI Tiva LaunchPad board first, and then follow the next article to learn how to create a C project with Keil μVisio.
Procedures
1. Create a C/C++ Project
Startup Keil μVision 5
- Launch Keil µVision5 by clicking on the icon
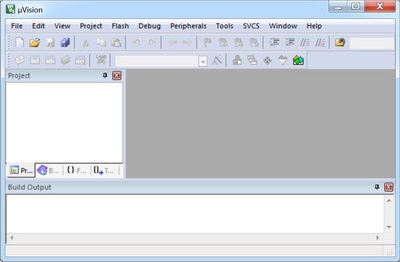
 from the desktop or find this program from the "Start" menu, "All Programs" on your computer. You will see the following screen.
Create a new Project for the Tiva LaunchPad Board
Next, you will use Keil μVision to create a C project and execute this program on your target Tiva board.
Before you create a new project, it is recommended that you create a folder to store all your projects and files. For example, you can have a folder EE3450 ready beforehand.
Let's create your first ARM μVision project now.
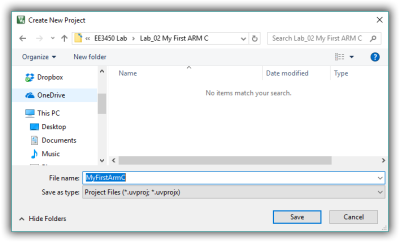
- In the main μVision menu, select Project ➤ New µVision Project. The Create New Project window opens up.
- Select the project folder you have prepared, assign this project the following name: MyFirstARMC, and then click on the Save button.
- The Select Device for Target 'Target1'... window opens, and you have to select which processor family will be usedEK-TM4C123GXL board: from the list of devices select "Texas Instruments ➤ Tiva C Series ➤ TM4C123x Series" and from the new list select TM4C123GH6PM. Click OK
- EK-TM4C1294XL board: from the list of devices, select "Texas Instruments➤Tiva C Series➤TM4C129x Series", and from the new list, select TM4C1294NCPDT. Click OK
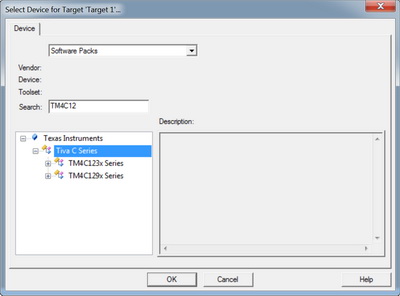
- Click OK, and the Manage Run-Time Environment window opens and shows the related software components for the device.
Two components must be selected for the Tiva LaunchPad board in your C project. In the Manage Run-Time Environment window, select the following components for your project:
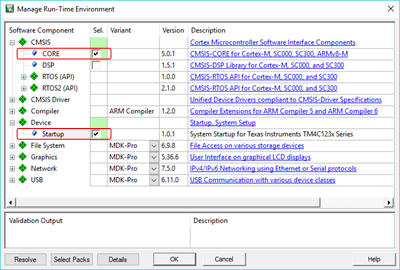
- Click "OK" to close this window.
- Two files are added to your project:
- startup_<device>.s
This file has reset handler and exception vectors (including stack and heap configuration) - system_<device>.c
This is a configuration file for basic device setup (clock and memory bus)
- startup_<device>.s
2. Setup the Debug Method - Use Target Debugging
You can select the Simulator-based debugging or a target firmware level debugging from the Debug option.
- If the Use Simulator is selected (left-hand side), the firmware does not need to be downloaded into the target machine. The IDE provides an application firmware debugging environment by simulating the target hardware in a software environment. It is most suitable for offline analysis and rapid code development.
- If the Target Debugging is selected (right-hand side), the binary file created by the cross-compilation process needs to be downloaded into the target hardware, and the debugging is done by single-stepping the firmware. A physical link should be established between the target hardware and the PC on which the IDE is running for target-level debugging.
Make sure you enable the following selections on both debug methods:
- Enable Load Application at Startup for loading the application into the μVision debugger whenever a debugging session is started.
- Enable Run to main() for executing the instructions up to the first executable statement of the main() function. The instructions are executed upon each reset.
Use Simulator
The Simulator option configures the µVision Debugger as a software-only product that simulates the instruction set of an Arm Cortex-M-based microcontroller. Developers can test and debug embedded applications before the hardware is ready.
To use simulation, you need to enable it in µVision. Go to Project ➤ Options for Target and move to the Debug tab. Enable Use Simulator on the left-hand side of the window:

Simulation Pros and Cons
Advantages
|
Limitations
|
Use Target Debugging
Target-level hardware debugging is achieved using the Keil-supported monitor programs or through an embedded interface. Normally the link between target hardware and IDE is established through a JTAG interface. The following steps show you how to configure Keil to debug the Tiva board using the on-board JTAG interface.
Select the Stellaris ICDI adapter:
- In the main μVision menu, select Project ➤ Options for Target..., or click the Target Options
 button to open the Options dialog. Select the Debug tab.
 - In the "Use" box on the right-hand side, then select the Stellaris ICDI interface.
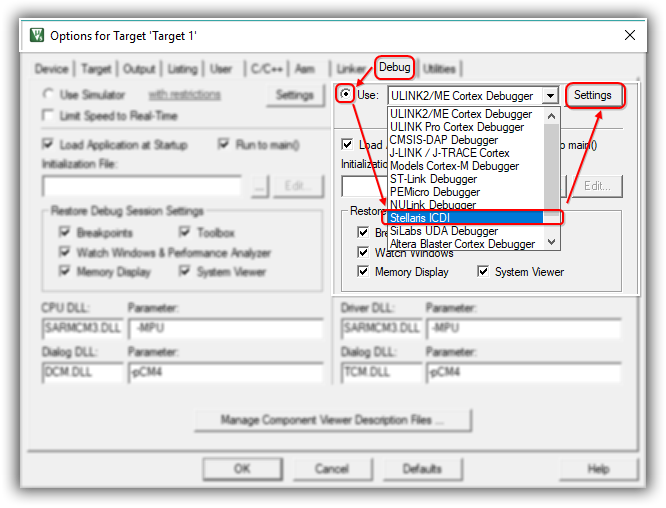
- Click on the Settings button. The Stellaris Debug Interface DLL window opens.
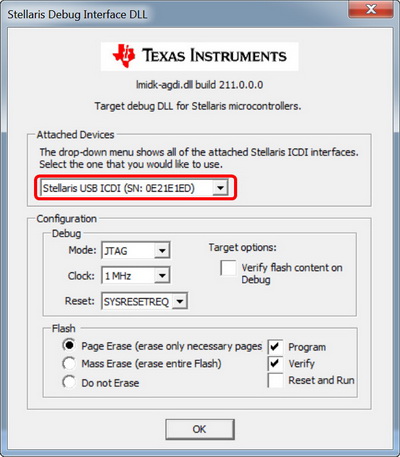
- You must see Stellaris USB ICDI in the attached Devices box with a valid SN number. This indicates that μVision is connected to the Tiva LauncdPad debug module.
If you see an error message or nothing in the "Attached Devices" box, make sure the Tiva LaunchPad board is connected to your computer through the Debug Port. (There are two USB connectors on the Tiva board; one is for debugging, another is for your application used) If the board is already connected to the bedbug port (JTAG) and the power LED also lights up, then you may need to install the driver. Please check Lesson 01 for detailed information.
Configure Flash Programming Driver
- Select the Utilities tab in the Options dialog.
- In the Configure Flash Menu Command box, select Use Target Driver for Flash Programming, uncheck Use Debug Driver and then select Stellaris ICDI driver.
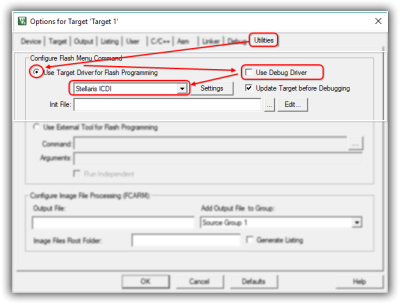
- Click OK to close the window and return to the main menu.
3. Add MyDefines.h and Common folder into the Project
3.1 Create MyDefines.h
If you have already created the MyDefines.h file in the Common folder, you can skip this part and continue to step 3.2.
- Using Notepad++ or other text editors to create a text document and type the following content to the file:
#ifndef __MYDEFINES_H #define __MYDEFINES_H #endif - Save the file inside the Common folder, and name it to "MyDefines.h". Later, we will add new definitions to the MyDefines.h file.
3.2 Add MyDefines.h and Common folder to the project.
- In the Keil main window. Right-click on Source Group 1 and click Add Existing Files to Group 'Source Group 1'...
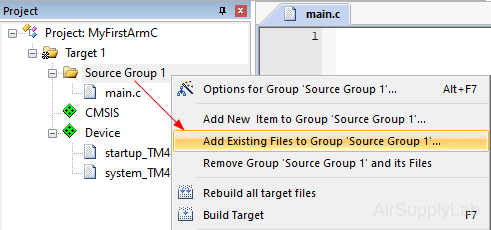
- In the open window, change the location to the Common folder, then change the file type to a Text file (*.txt; *.h; *.inc). Select MyDefines.h file, or enter the File name "MyDefines".
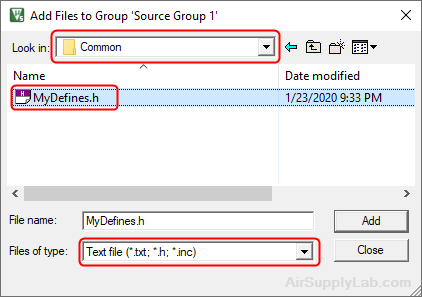
Click Add, and then click Close to close the window. - Now you have already added MyDefines.h file to your project.
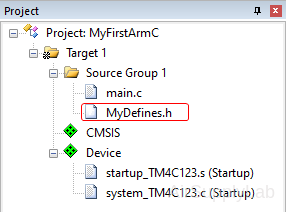
- Add the Common folder to the Include Paths. So the compiler will know where to find the MyDefines.h file.
Open the Option for Target window, change the tab to C/C++, and add the Common folder to the Include Paths field.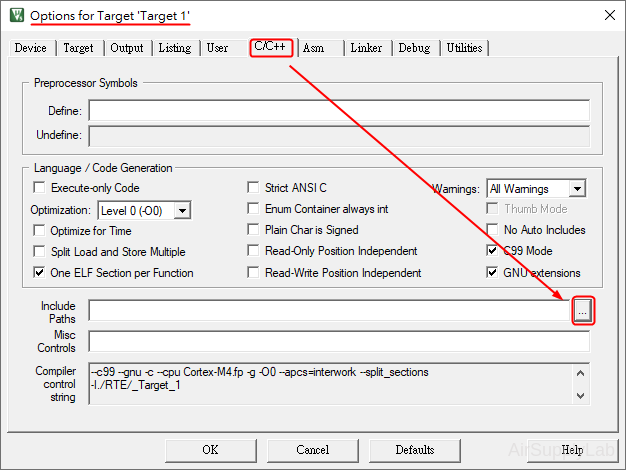
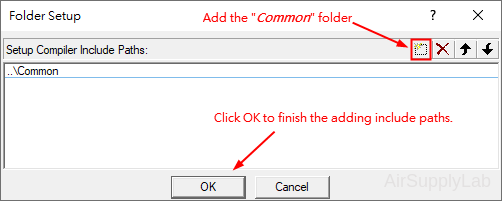
Click OK to close the Options window.
4. Add the main.c file
Add the main.c file
Next, you will create a C source file for your first project.
- Expand Target 1 on the Project Window, right-click "Source Group 1" and select "Add New Item to Group 'Source Group 1'..."
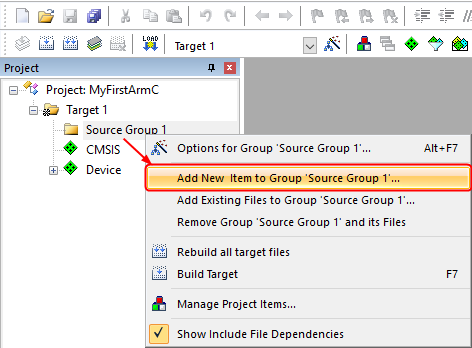
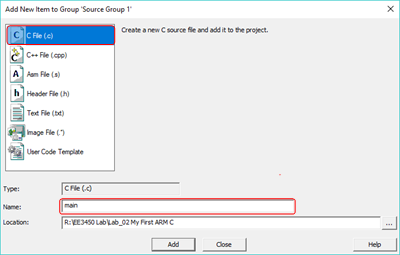
- In the open window, select the file type to C File (.c), and enter the Name "main.c". Click on "Add".
- You have created a C project for Tiva LauncdPad, and you will see the "main.c" edit window on the main screen. This is the place where you will write your C language program. In the next step, copy and paste this lesson's C Sample Firmware code into your main.c file.
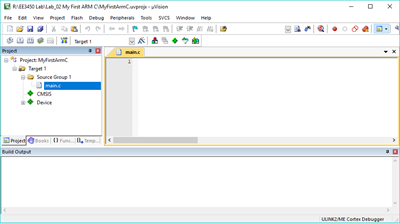
Now you have already added a C source code to your project. You can write your embedded C code or copy the following example code into your project.
The embedded system does not have console mode, which means you cannot directly use "printf" function to print a message in the console.
EK-TM4C123GXL LaunchPad
/* This is the first C language program for Tiva LaunchPad that you see in the lab
 This program template was created by Airs Lin @ 2017 California State University of Los Angeles.
 When you write your program, you could have your info at the top document block
 For Example:  Your Name, Student Number, purpose of the program, etc.
*/

#include <stdio.h>
#include <stdlib.h>
#include <stdbool.h>
#include <stdint.h>

#include "TM4C123GH6PM.h"
#include "MyDefines.h"

int main(void)
{
    // Place your initialization/startup code here (e.g. Setup_GPIO())

    while(1) {
        // Place your application code here.

    }
}
EK-TM4C1294XL LaunchPad
/* This is the first C language program for Tiva LaunchPad you see in the lab
 This program template was created by Airs Lin @ 2017 California State University of Los Angeles.
 When you write your program, you could have your info at the top document block
 For Example:  Your Name, Student Number, what the program is for, and what it does etc.
*/

#include <stdio.h>
#include <stdlib.h>
#include <stdbool.h>
#include <stdint.h>

#include "TM4C1294NCPDT.h"
#include "MyDefines.h"

int main(void)
{
    // Place your initialization/startup code here (e.g. Setup_GPIO())

    while(1) {
        // Place your application code here.

    }
}
5. Add ezTivaLIB to the Project
The ezTivaLIB is a useful library that supports system frequency, peripheral devices, and delay functions. You can follow the instructions (Lesson 05: Branches) to add the ezTivaLIB into you project
6. (Optional) C with TivaWare Software/Library
The TivaWare software is a very useful library that helps embedded system developers to simplify and speed up the development of Tiva LaunchPad applications. It is written entirely in C language, and it has a free license, which allows royalty-free use so developers can create and build full-function, easy-to-maintain code.
The complete TivaWare software includes:
- Royalty-free libraries (Peripheral, USB, Graphics, Sensor)
- Kit- and peripheral-specific code examples for TM4C123x devices
If you want to use TivaWare software with Keil IDE, you will need to perform the following extra steps in order to add the TivaWare into your project.
Add TivaWare Hooks
- Add TivaWare Library to your project.
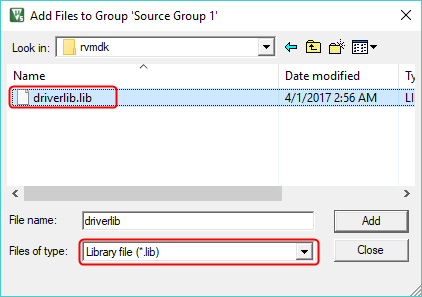
Expand the Target on the Project Window, right-click the "Source Group 1" folder, and select "Add Existing Files to Group 'Source Group 1'..."
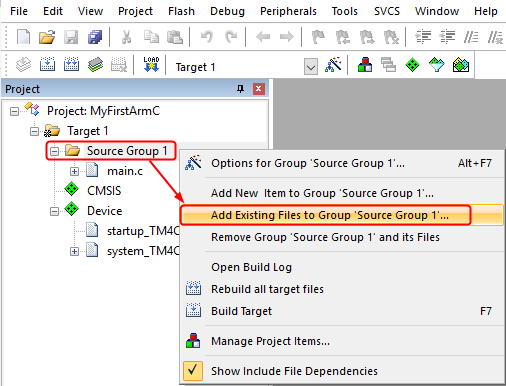
- In the pop-up window, change the "Files of type" drop-down from "C Source file (*.c)" to "Library files (*.lib)" or "All files", then Browse to C:\ti\TivaWare_C_Series-2.1.4.178\driverlib\rvmdk and select driverlib.lib file. Click the Add button and click Close to return to the main menu.
- Next, configure the project.
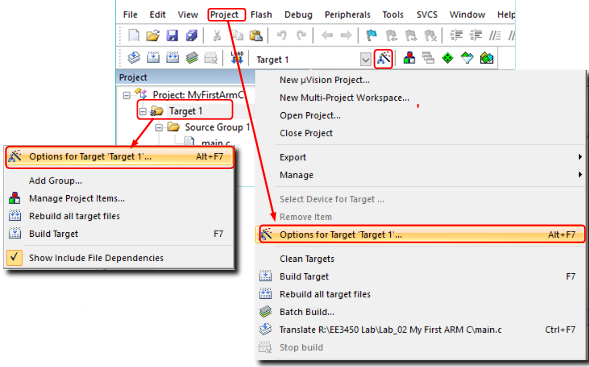
(a) Open the "Options for Target" dialog
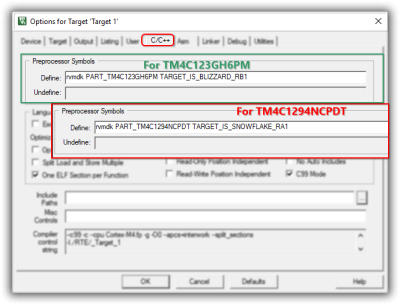
 (b) select the "C/C++" tab in the project options. Type the following definition on the Processor Symbols ➤ Define:
The "rvmdk" tells the project that you are using the ARM compiler; the "PART_xxx" and "TARGET_xx" are used in the TivaWare to compile the Keil-specific sections correctly.
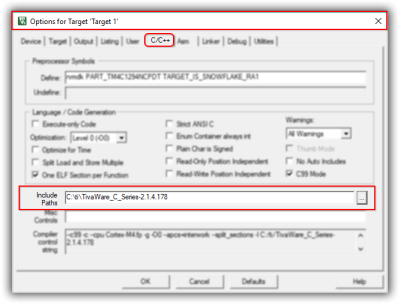
(c) Add the top-level TivaWare directory (C:\ti\TivaWare_C_Series-2.1.4.178) to the Include paths field.
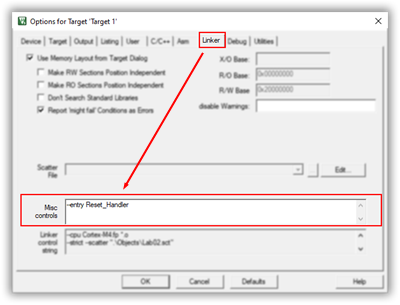
(d) In the Link tab, add --entry Reset_Handler definition on Misc controls.
Template Source Code with Tivaware
EK-TM4C123GXL LaunchPad
#include <stdio.h>
#include <stdlib.h>
#include <stdint.h>
#include <stdbool.h>

#include "inc/hw_memmap.h"
#include "inc/hw_types.h"
#include "driverlib/sysctl.h"


int main()
{
    // Place your initialization/startup code here (e.g. Setup_GPIO())
    SysCtlClockSet(SYSCTL_SYSDIV_5 | SYSCTL_USE_PLL | SYSCTL_XTAL_16MHZ | SYSCTL_OSC_MAIN);

    while(1) {
        // Place your application code here.

    }
}
EK-TM4C1294XL LaunchPad
#include <stdio.h>
#include <stdlib.h>
#include <stdint.h>
#include <stdbool.h>

#include "inc/hw_memmap.h"
#include "inc/hw_types.h"
#include "driverlib/sysctl.h"


int main()
{
    // Place your initialization/startup code here (e.g. Setup_GPIO())
    SysCtlClockFreqSet(SYSCTL_USE_PLL | SYSCTL_XTAL_25MHZ | SYSCTL_CFG_VCO_480 | SYSCTL_OSC_MAIN, 120000000);

    while(1) {
        // Place your application code here.

    }
}
7. Build the Application
Build the Application
- Build the application using the toolbar button
 Rebuild, or from the menu Project ➤ Build Target.
 - The Build Output window shows information about the build process. An error-free build shows information about the program size.
8. Download and Run the Application
Download and Run the Application
- Connect the target hardware to your computer using a debug adapter that typically connects via USB. TI Tiva LaunchPad boards provide an on-board debug adapter.
- Now, review the settings for the debug adapter.
Click Options for Target on the toolbar and select the Debug tab. Verify that the correct debug adapter of the evaluation board you are using is selected and enabled
 - Click
 Download on the toolbar to load the application to your target hardware.
The Build Output window shows information about the download progress. - Press the RESET button on the target board to run the application.
9. Debug the Application
Debug the Application
- Click Debug ➤ Start/Stop Debug Session, or
 button on the toolbar to start debugging the application by the simulator or on hardware.
 - Click Debug ➤ Run, or click
 button on the Debug toolbar, or [F5] key to start executing the application.
 - If Keil is already in debug mode, clicking the
 button again will cause Keil to jump back from the debug mode to the edit mode.
The debug menu and commands are listed as below:
| Debug Menu | Toolbar | Shortcut | Description |
|---|---|---|---|
| Start/Stop Debug Session | Ctrl+F5 | Starts or stops a debugging session. | |
| Start/Stop Energy Measurement Session | Starts or stops an energy measurement-only session. | ||
| Reset CPU | Sets the CPU to RESET state. | ||
| Run | F5 | Continues executing the program until the next active breakpoint is reached. | |
| Stop | Stops the program execution immediately. | ||
| Step | F11 | Executes a single-step into a function; Executes the current instruction line. | |
| Step Over | F10 | Executes a single-step over a function. | |
| Step Out | Ctrl+F11 | Finishes executing the current function and stops afterward. | |
| Run to Cursor Line | Ctrl+F10 | Executes the program until the current cursor line is reached. | |
| Show Next Statement | Shows the next executable statement/instruction. | ||
| Breakpoints | Ctrl+B | Opens the dialog Breakpoints. | |
| Insert/Remove Breakpoint | F9 | Toggles the breakpoint on the current line. | |
| Enable/Disable Breakpoint | Ctrl+F9 | Enables/disables the breakpoint on the current line. | |
| Disable All Breakpoints | Disables all breakpoints in the program. | ||
| Kill All Breakpoints in Current Target | Ctrl+Shift+F9 | Removes all breakpoints in the current target. | |
| Kill All Breakpoints in Active Project | Removes all breakpoints in the active project. | ||
| Kill All Breakpoints in Multi-Project Workspace | Removes all breakpoints in all projects of the workspace. |
When you click the Debug button on Keil, the debugger immediately exits upon entering. Keil can still download the code to target but will not run the debugger. Please check the [KB 03: Keil Debugging Issue] to solve the problem.

