KB 01: Install Intel Quartus Prime Lite and Driver
This article focused on guiding users through installing Intel Quartus Prime (Lite) Edition and its associated drivers. Quartus Prime is a software tool developed by Intel for FPGA (Field-Programmable Gate Array) and CPLD (Complex Programmable Logic Device) design. The Lite Edition is a free version of this software, offering essential features for design and development. This article includes step-by-step instructions on downloading the software from Intel's website, system requirements, and how to successfully install the Quartus Prime software and any necessary drivers on a compatible computer system.
KB01.1 Download and Install Intel Quartus Prime Lite
To download the FPGA software from Intel, you must create an account first.
Register an account on the Intel website.
- Please register a Standard Access account on the following link:
https://www.intel.com/content/www/us/en/my-intel/fpga-sign-in.html - Fill in the personal information by using your campus email address and phone number in the application form.
- After you submit the registration form, Intel will send you an activation email. Please check your email system and click the link to activate your account.
Download Intel Quartus Prime Lite Software
- Download the FPGA development tools from the Intel Download Center (Quartus Prime Software only supports Windows x64)
You can download the Quartus Prime Lite (free license) or Standard (need a valid license) from the Intel Download Center for FPGAs: Download Intel Quartus Prime Software. - Looking for Intel Quartus Prime Lite Edition Design Software Version 21.x for Windows and click on it.
- On the Individual Files tab, download the following files:
- Intel Quartus Prime (includes Nios II EDS)
- Questa - Intel FPGA Edition
- MAX 10 FPGA Device Support
Install Intel Quartus Prime Lite
- Wait until all three files are completely downloaded. Open the download folder and double-click the QuartusLiteSetup-21.x.x.xxx-windows.exe to start the installation.

- The Intel Quartus Prime software installer is the main installer program. It installs other software if that installer exists in the same folder. Here, the installer will automatically select the MAX 10 Device and Questa - Intel FPGA Starter Edition (Free).
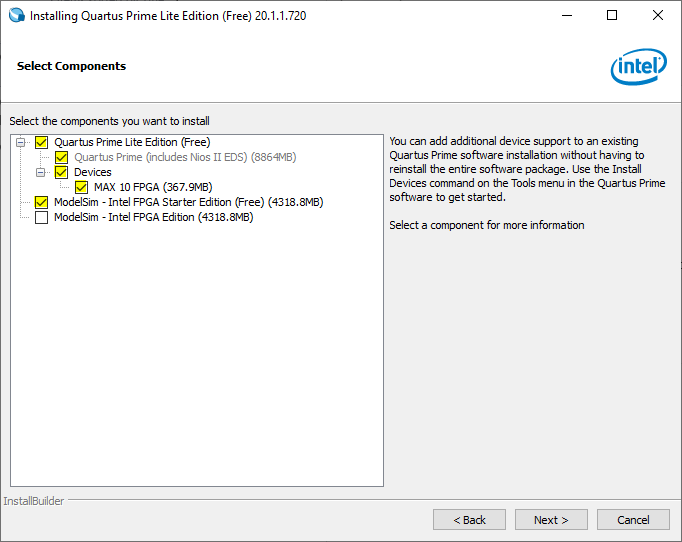
- After installing Quartus Prime and Questa on the computer, the installer will install the USB-Blaster driver.
KB01.2 Request a License File for Questa-Intel FPGA Starter Edition
Request a License File from Intel
The Intel Quartus Prime Lite Edition is free and does not require a license. Questa-Intel FPGA Starter Edition is also free but requires zero-cost licenses. The Intel Quartus Prime Pro Edition software requires no license for Intel Cyclone 10 GX devices only.
- You must log in to the Intel Self Service Licensing Center to create and manage your licenses. From the Self Service Licensing Center Home page, click Sign up for Evaluation or Free License to request a license for Questa-Intel FPGA Starter Edition.
Select Questa-Intel FPGA Starter Edition, enter 1 in the # of Seats field.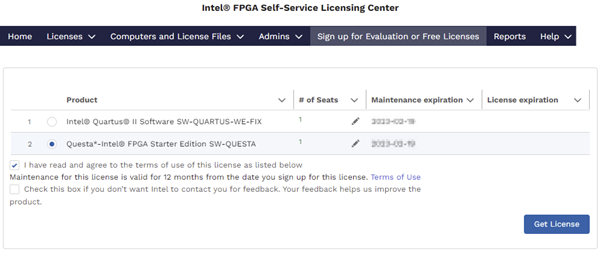
Once you have read the license terms of use, click the "I have read and agree to the terms of use of this license as listed below".
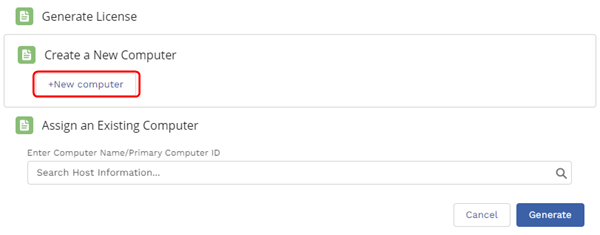
Proceed to click Get License. A window will pop out to ask which computer should the license be assigned to.
- Click +New computer to generate a new license for your computer.
- Open Command Prompt and type ipconfig /all to find the network interface card (NIC) on Windows. The command prints network information as below.
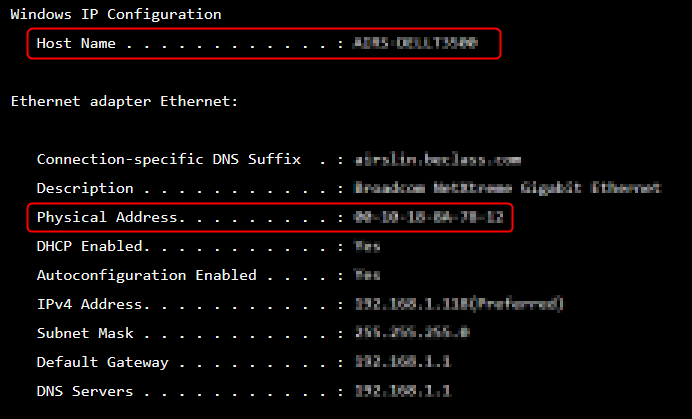
- The Computer Name appears as the Host Name.
- The Primary Computer ID is the number on the Physical Address line. This number is a 12-digit hexadecimal number.
If the system has more than one network card, you can use the NIC ID of any network card connected to the computer.
- Enter the information in the following dialog to generate a new license for your computer.
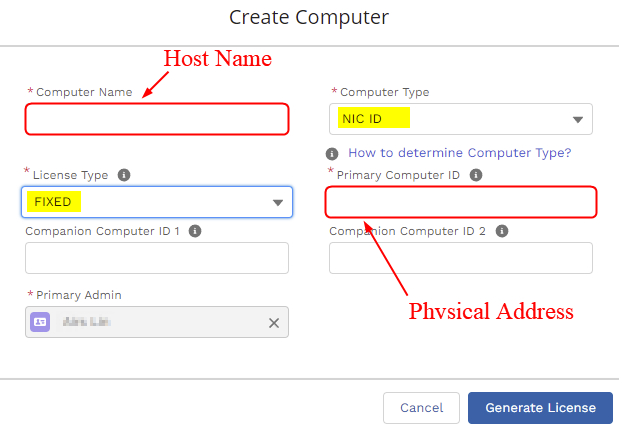
- Click Generate License and Intel will send the license file to the email address in your My Intel account profile.
Setup License for the Questa-Intel FPGA Starter Edition Software
Download the license file from the email and save it in the IntelFPGA or IntelFPGA_lite folder.
- Right-click on the Windows Start icon and select System.
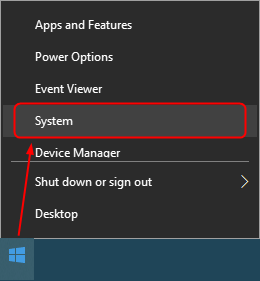
- Click Advanced System Settings to open the System Properties dialog.
- In the Advanced tab, click Environment Variables.... In the System Variables, create a New variable with the name = LM_LICENSE_FILE, and click Browse file... to locate the license file.
- Click OK.
KB01.3 Configure Quartus Prime Software
Start the Intel Quartus Prime software.
Specify EDA Tool Settings
Perform the following steps to specify EDA Tool Options.
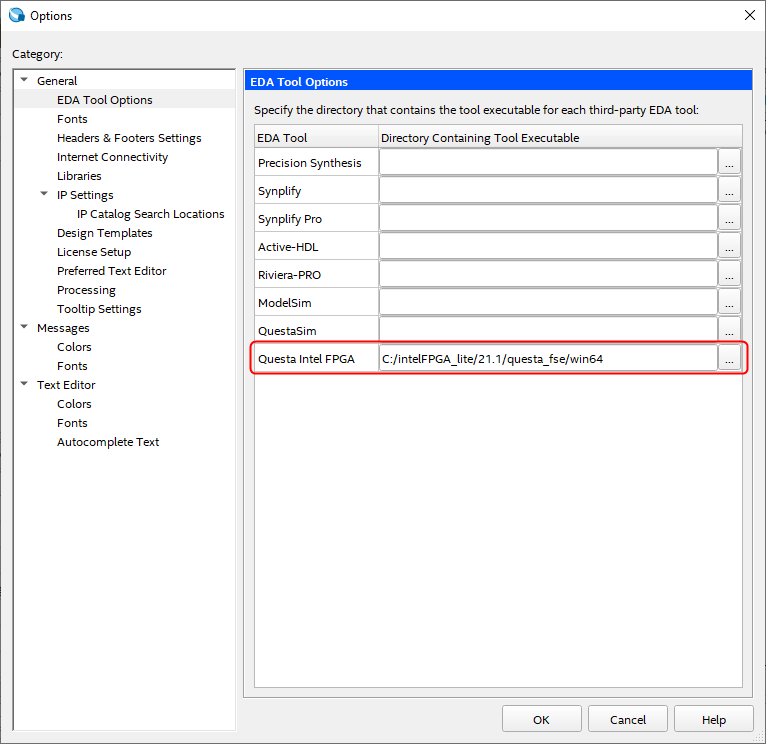
- Click Tools ➤ Options... ➤ EDA Tool Options to specify the location of your simulator for integration with Intel Quartus Prime.
- In the Questa Intel FPGA field, enter the following Questa-Intel FPGA Edition executable path:
- Questa - Intel Starter (Free): C:\intelFPGA_lite\<version>\questa_fse\win64
- Questa - Intel Standard: C:\intelFPGA\<version>\questa_fe\win64
- Click OK to close EDA Tool Options dialog.
Configure the Text Editor
To set up Text Editor, a source file must be created.
- Select File ➤ New... from the Menu bar. Select Verilog HDL File from the Design Files list and click OK.
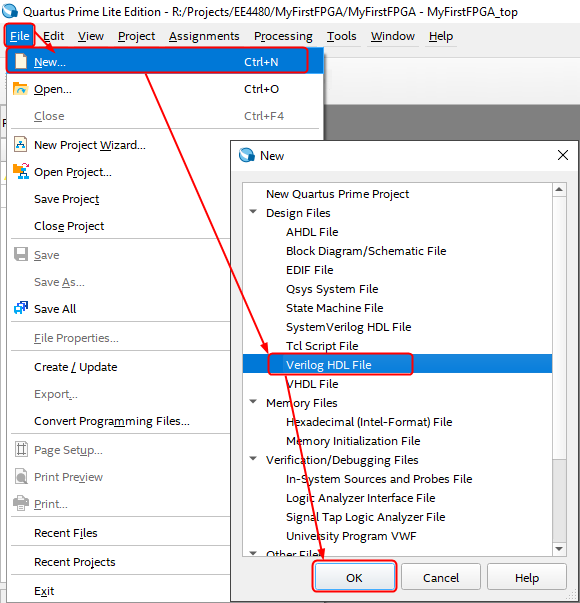
- Click Tools ➤ Options ➤ Text Editor, then make sure to check the options as below, and then click OK to save the change.
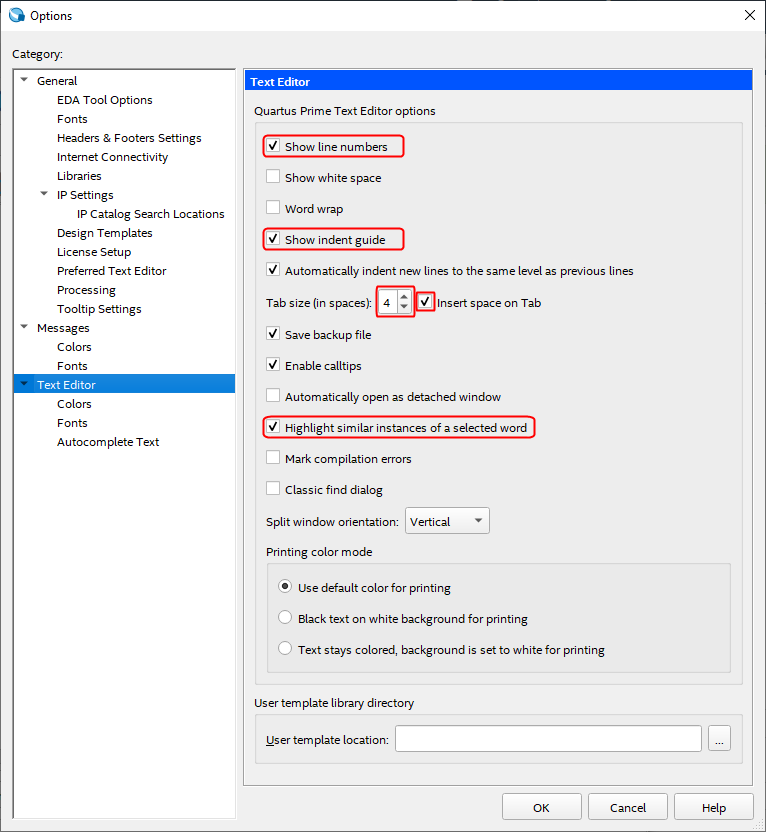
- Next, close the file without saving it.
KB01.4 Install USB Blaster Driver in Windows 11
If you are using the Intel FPGA board, you must connect the FPGA board to your computer through a USB connection. Then, right-click on the Windows Start button ![]() to launch the Device Manager.
to launch the Device Manager.
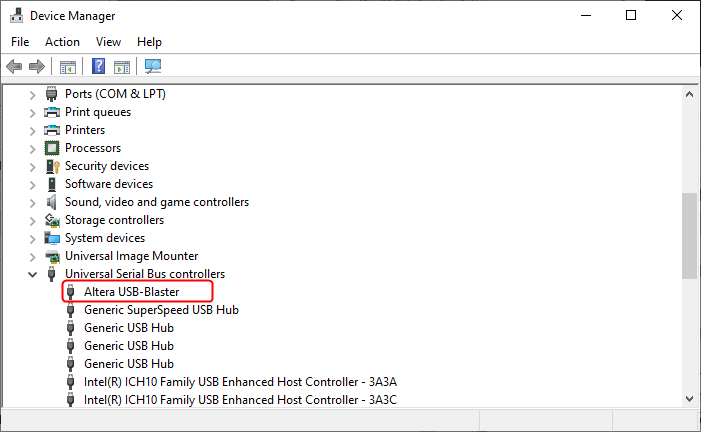
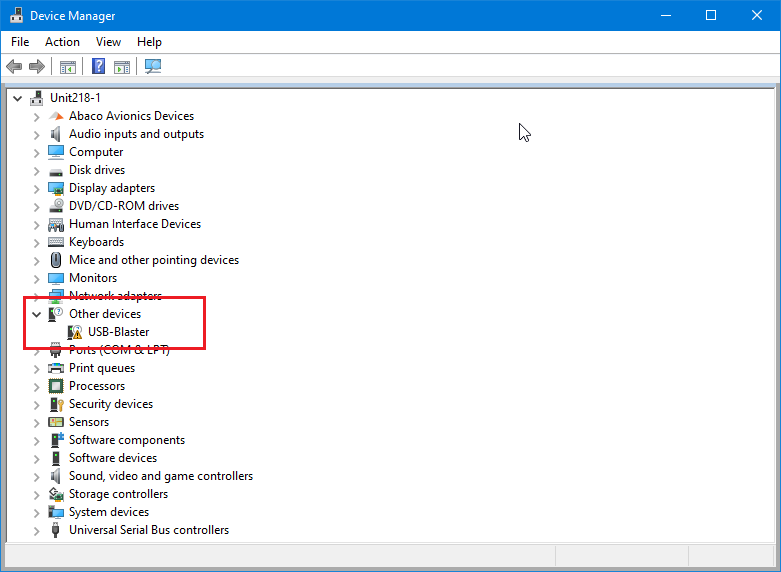
You have to follow the steps listed below to install the driver.
Follow the steps to install the driver.
- Right-click on the USB-Blaster and select Update driver.
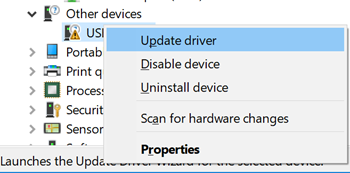
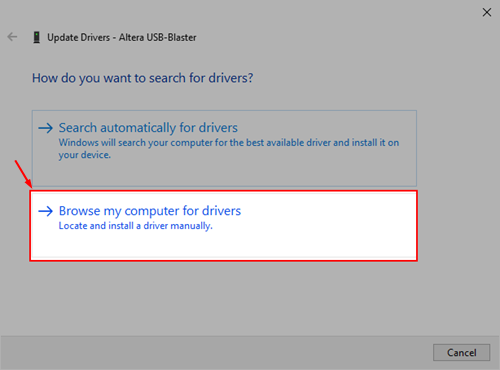
- A window prompt asks: How do you want to search for driver software? Select Browse my computer for drivers.
- Under Search for driver software in this location, click Browse.
Browse to the C: driver, open the IntelFPGA_lite ➤ <Version> ➤quartus ➤drivers folder, then click OK. Make sure to check the Include subfolders option, and then click Next.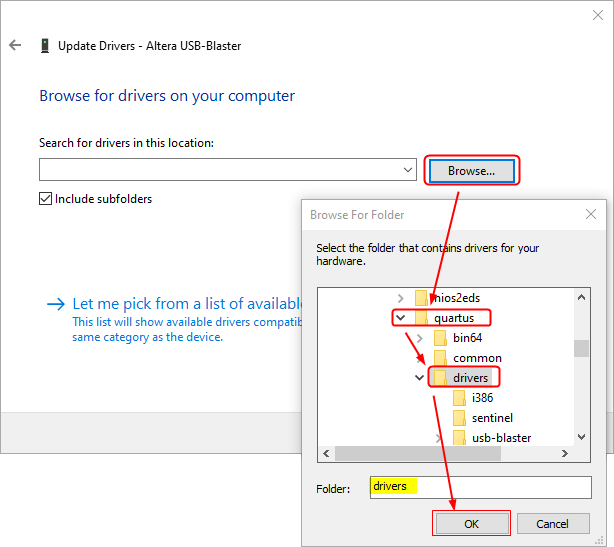
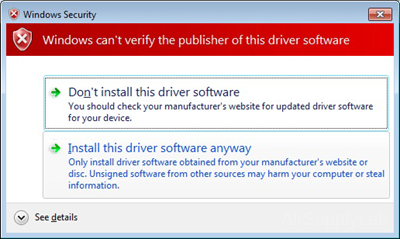
- A warning may appear that says Windows can't verify the publisher of this driver software. This message appears because the driver is not signed. Click Install this driver software anyway to proceed.
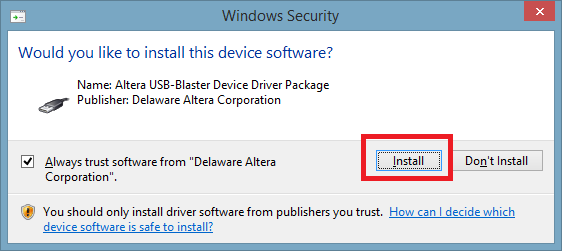
- Click the Close button when you see the "Windows has successfully updated your driver software" dialog.
KB01.5 Disable the Driver Signature Enforcement on Windows 10
Use the following methods to disable driver signature verification on Windows 10.
Use an Advanced Boot Option
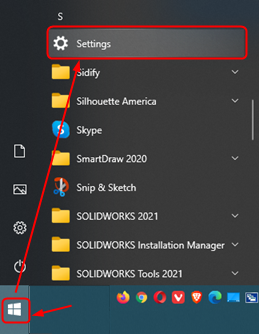
- Open the Windows Settings by one of the following methods:
(1) Click the notification area in the lower right corner of the screen and select All settings.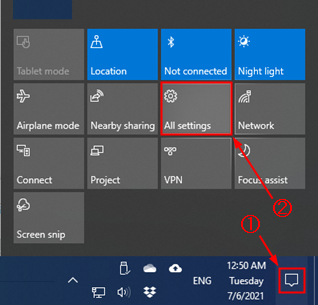
or (2) Click the Start menu and select Settings
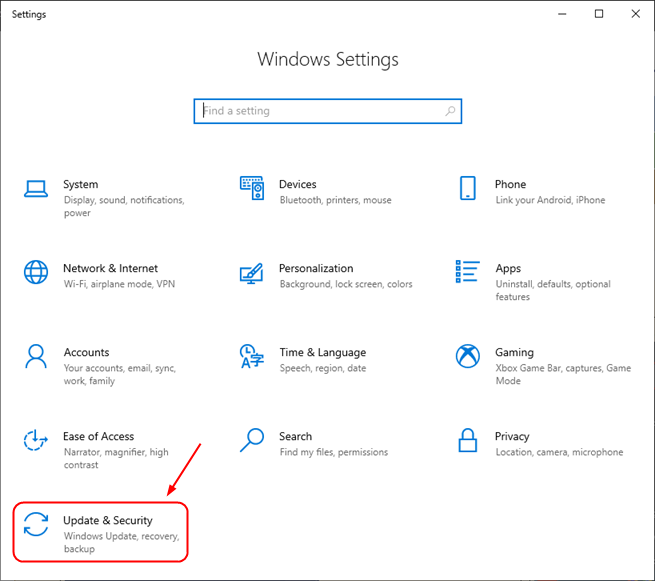
- Click Update & Security.
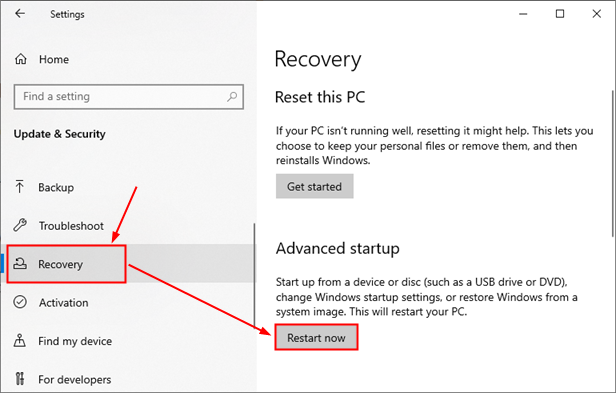
- Click on Recovery, and then click Restart now under Advanced Startup.
- Select Troubleshoot.
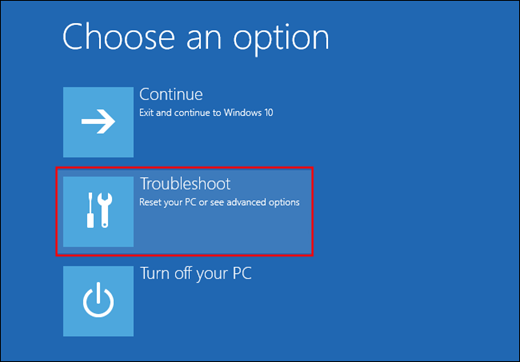
- Select Advanced options.
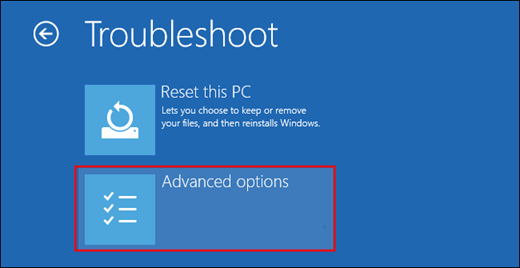
- Click the Startup Settings.
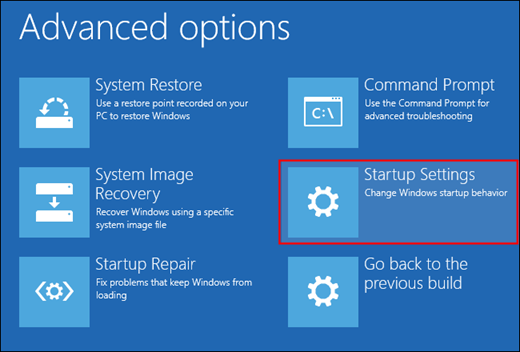
- Click the Restart button to restart your PC into the Startup Settings screen.
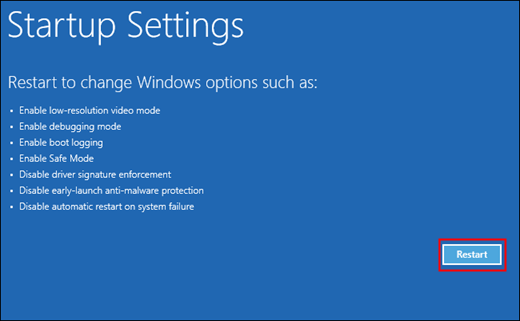
- After reboot, if you can see the Startup Settings screen, press 7 to activate the Disable driver signature enforcement option.
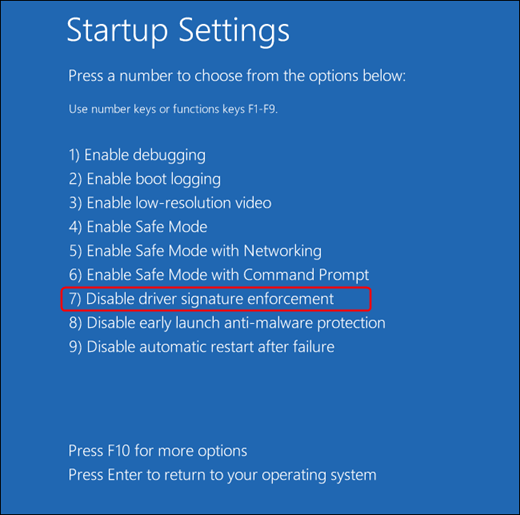
Windows will restart once again, and you will be able to install the USB Blaster driver properly.
Note: the next time you restart Windows, driver signature enforcement will be enabled again. To protect your system, it is highly recommended that you restart your system after installing the USB Blaster driver.
- If your screen displays the following BitLocker password prompt screen, it means your Windows has enabled data encryption.
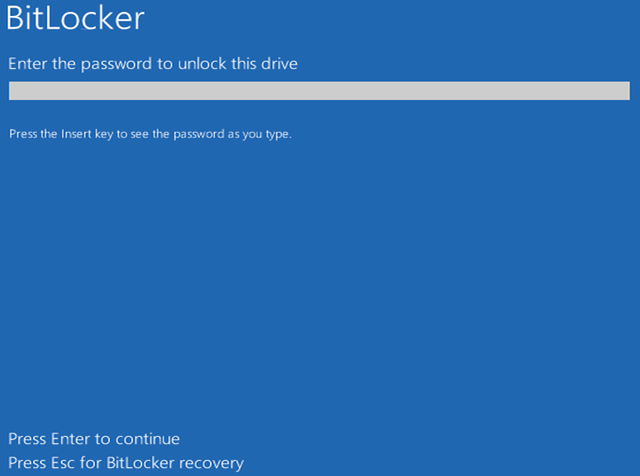
Press the Power button for 5 seconds to power off your computer. - To disable driver signature enforcement, the BitLocker must be disabled first. Restart your computer and follow the KB01.5 section to disable BitLocker drive encryption on the system drive.
