Lesson 00: Nvidia Jetson Orin Nano Developer Kit
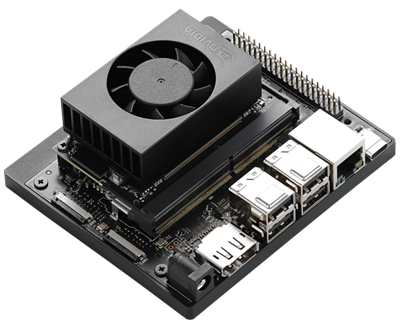
The Nvidia Jetson Orin Nano Developer Kit is a powerful AI platform for developers and hobbyists. It features an advanced GPU and CPU architecture, providing robust performance for AI and machine learning tasks. The kit includes various I/O ports and expansion options, making it suitable for multiple applications, from robotics to IoT projects. With support for the Nvidia JetPack SDK, developers can access comprehensive tools and libraries to accelerate AI development. This kit is ideal for creating innovative AI solutions and rapid prototyping.
Hardware Requirements
The following items are necessary or highly recommended to set up your Jetson Orin Nano Developer Kit properly. If you do not currently have these items, it is advisable to acquire them before proceeding with this guide.
- Storage
- microSD card (64GB or bigger capacity)
- SAMSUNG PRO Endurance 128GB MicroSDXC Memory Card (MB-MJ128KA/AM): [amazon.com]
- SanDisk 128GB MAX Endurance microSDXC Card (SDSQQVR-128G-GN6IA): [amazon.com]
- NVMe SSD (Optional but highly recommended)
- microSD card (64GB or bigger capacity)
- Terminal Access
- DisplayPort cable, DisplayPort capable monitor, and a USB keyboard
- Or, DisplayPort to HDMI cable (amazon.com), HDMI capable monitor (or TV), and a USB keyboard
- USB to TTL Serial cable (Advanced): [adafruit]
Update Firmware Version
To install the JetPack 6.0 GA image file on your Jetson Orin Nano, ensure the UEFI Firmware version is 36.3 or newer. Follow these steps to check your firmware version:
- Connect a monitor and USB keyboard to your developer kit.
- Power ON the developer kit by plugging in the included DC power supply.
- When the NVIDIA logo appears on the screen, repeatedly press the ESC key on the keyboard.
- The UEFI setup menu should appear.
- Look at the third line from the top (below "Not specified") to find the Jetson UEFI firmware version number.
If your Jetson Orin Nano firmware version is less than 36.0, you must update the firmware to make the JetPack 6 SD card work. Follow these steps to perform the upgrade:
- Flash JetPack 5.1.3 image onto your microSD card:
- Download JetPack 5.1.3 image: [download]
- Use Balena Etcher to flash the image file to the SD card: [Balena official site]
- Insert the flashed microSD card into the slot on the Jetson module
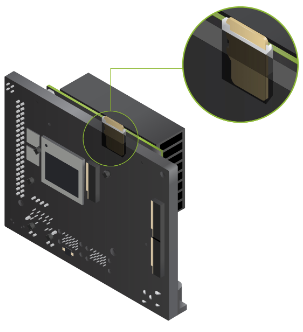
- Power ON and reboot to ensure firmware updates to 5.0 (JetPack 5.1.3):
- Turn ON the Jetson Orin Nano Developer kit with JetPack 5.1.3 SD card inserted by plugging in the DC power supply.
- Complete the initial software setup (oem-config)
- Ensure firmware update is scheduled.
- Once Jetson boots into the Jetson Linux system, a background service will automatically schedule a firmware update (if needed) to be performed during the next boot-up process.
- After about 5 minutes or once you see the update message as below, reboot.
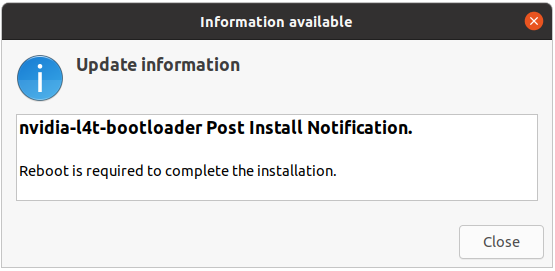
- Reboot your Jetson Orin nano Developer kit. During the bootup process, the firmware should update to 5.0-35550185.

- Install and run the QSPI Updater package:
- Verify your firmware version is up to date (35.5.0 = JetPack 5.1.3). On the Jetson terminal, run:
sudo nvbootctrl dump-slots-info
You should see the Current version indicating 35.5.0.
Current version: 35.5.0
Capsule update status: 0
Current bootloader slot: A
Active bootloader slot: A
num_slots: 2
slot: 0, status: normal
slot: 1, status: normal - Install the QSPI Updater Debian package to trigger another (final) firmware update. On the Jetson terminal, run the following:
sudo apt-get install nvidia-l4t-jetson-orin-nano-qspi-updater
This will automatically schedule a final firmware update during the next boot process to prepare the firmware for JetPack 6.
- Verify your firmware version is up to date (35.5.0 = JetPack 5.1.3). On the Jetson terminal, run:
- Reboot and Power OFF the developer kit:
- Reboot your
Once the QSPI update is scheduled, reboot your Jetson Orin Nano Developer Kit. - Observe update
You can observe the update during the bootup process. - Power off
Once the update is done, it reboots and tries to boot. However, it will get stuck UNLESS you change the SD card to JetPack 6 one.
Therefore, you should power off the developer kit by disconnecting the DC power supply.
Note: The firmware update process may be confusing as there won't be explicit messages on the monitor or debug UART. The firmware inside the QSPI-NOR flash memory is now updated and ready for the JetPack 6 SD card, but it is incompatible with the JetPack 5.1.3 SD card. Power off and insert the new JetPack 6 SD card.
- Reboot your
- Flash JetPack 6.0 GA image onto your microSD card:
Once the onboard firmware is up-to-date and ready for JetPack 6, boot the Jetson Orin Nano Developer Kit with a microSD card containing JetPack 6.0 GA.
Setup the Jetson Orin Nano DevKit
Checking JetPack Version
You can check the NVIDIA JetPack version using various methods:
- For older version, check for existing files:
cat /etc/nv_tegra_release - For later versions, check L4T versions:
dpkg-query --show nvidia-l4t-core dpkg -l | grep 'nvidia-l4t-core' sudo apt-cache show nvidia-jetpack dpkg -l | grep -i 'jetpack' - To check the CUDA version:
nvcc --version - Using jtop Tool:
jtop
If you are booting up the Jetson Orin Nano for the first time, follow the on-screen GUI instructions to complete the Linux setup, including creating a user account, connecting to the internet, and applying application updates. After completing these steps, open the terminal to update the system manually.
Update Package Repository
Some libraries on the JetPack system might be outdated, so updating your package repository is important. Ensure your device is connected to the internet, then open the Terminal and type the following commands to update the repository list, upgrade all applications, and then reboot the system:
sudo apt-get update
sudo apt-get upgrade
sudo reboot
Install some useful Linux Packages:
- Editor Tools
- nano Editor:
You need a text editor to edit files on the NVIDIA Jetson Nano device. You can use an official editor from the Ubuntu desktop, such as gedit. However, you can also use vi and nano to write code. To install nano, use this command in the Terminal:
sudo apt-get install nano - Visual Studio Code:
You can also use Microsoft Visual Studio Code, which is particularly useful when working on the NVIDIA Jetson Nano desktop. For more information about Visual Studio Code, visit https://code.visualstudio.com.
- nano Editor:
- Python
- Check Python Version:
Python is installed on the NVIDIA JetPack system. You can verify this by typing the following command in Terminal:
python --version python2 --version - Python Virtual Environment:
Install Python venv package
confirm that venv is installed properlysudo apt-get install virtualenv
Generate an envvirtualenv --version
python3 -m venv my_env - Jupyter Notebook:
Most developers use Jupyter Notebook to write and run Python scripts for data processing or data science tasks. You can find more information at https://jupyter.org. To install Jupyter Notebook on your JetPack, open Terminal and type the following commands:
sudo apt-get install python3-pip sudo pip3 install jupyter - smbus Package for I2C Access in Python:
To access the I2C module on the NVIDIA Jetson Nano, use the smbus library. It is usually pre-installed, but if needed, install it manually with:
Now, you can write your Python program to read sensor data.$ sudo apt-get install python3-smbus
- Check Python Version:
- Node.js
Node.js is a JavaScript-based programming language designed for cross-platform, general-purpose use. You can use Node.js to build web applications. To install Node.js, type the following command:
This will give you the node command for running your Node.js applications. You can check the installed Node.js version by typing:sudo apt-get install nodejs npm
node --version - Intall Jetson Stats (jtop) Package
jtop is a powerful monitoring tool designed specifically for NVIDIA Jetson devices. It provides a comprehensive system performance overview, including CPU, GPU, memory, and power usage. With a user-friendly interface, jtop helps users monitor real-time statistics and optimize their Jetson device's performance efficiently.
- Update and install pip:
sudo apt update sudo apt install python3-pip - Install jetson-stats package:
sudo pip3 install -U jetson-stats - Reboot your Jetson device:
sudo reboot - Running jtop:
jtop
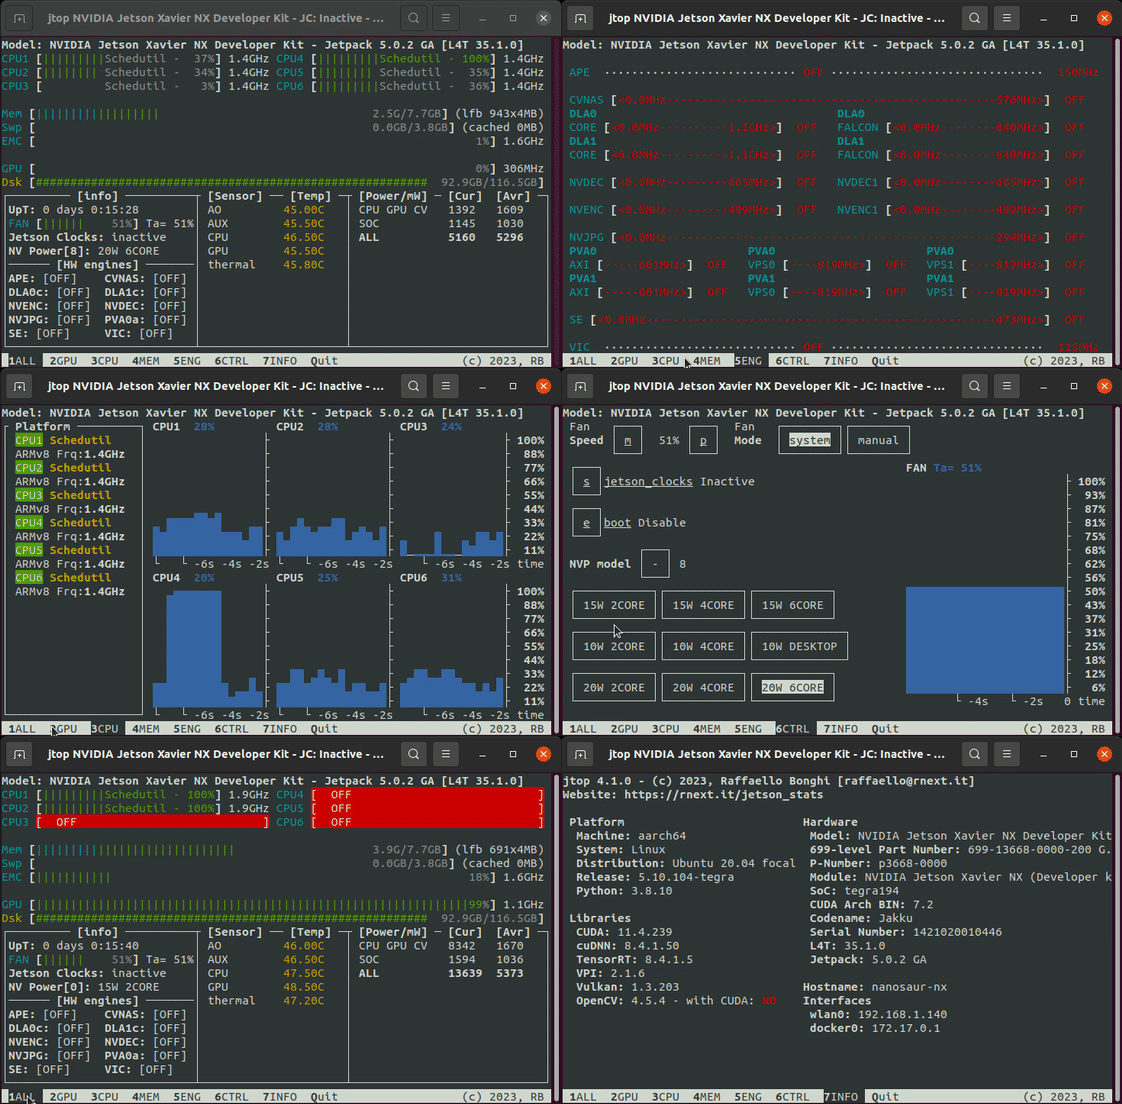
For more detailed information and troubleshooting, visit the "jtop project page". - Update and install pip:
Accessing NVIDIA Jetson Nano GPIO with Jetson.GPIO
To access the NVIDIA Jetson Nano GPIO, use the Jetson.GPIO library, adapted from the RPI GPIO (Raspberry Pi) library. You can find the library at Jetson.GPIO GitHub.
- Install Jetson.GPIO:
sudo pip3 install Jetson.GPIO - Configure security permissions:
Create a new GPIO user group and add your account:
sudo groupadd -f -r gpio sudo usermod -a -G gpio <your_account> - Copy the 99-gpio.rules file:
Verify the dist-packages path:
Copy the rules file to the appropriate directory:python3 -m site sys.path = [ '/home/user', '/usr/lib/python310.zip', '/usr/lib/python3.10', '/usr/lib/python3.10/lib-dynload', '/home/user/.local/lib/python3.10/site-packages', '/usr/local/lib/python3.10/dist-packages', '/usr/local/lib/python3.10/dist-packages/CubeNanoLib-1.0.1-py3.10.egg', '/usr/lib/python3/dist-packages', '/usr/lib/python3.10/dist-packages', ]
sudo cp /usr/local/lib/python3/dist-packages/Jetson/GPIO/99-gpio.rules /etc/udev/rules.d/ - Verification:
Open Python shell:
Type the following statements to check the Jetson.GPIO versionpython3
You should see the Jetson.GPIO library information and version.import Jetson.GPIO as GPIO GPIO.JETSON_INFO GPIO.VERSION
40-pin Expansion Header
Jetson Orin Nano Expansion Header J12 Pinout
By default, I2C and UART pins are assigned. All other pins (except power and ground) are assigned as GPIO. Pins labeled with other functions below are suggested functions.
| Sysf GPIO | Name | Pin Header | Name | Sysf GPIO | |||
|---|---|---|---|---|---|---|---|
| -- | 3.3V DC | 1 |  |
 |
2 | 5.0V DC | |
| I2C1_SDA (I2C Bus 7) | 3 |  |
 |
4 | 5.0V DC | ||
| I2C1_SCL (I2C Bus 7) | 5 |  |
 |
6 | GND | ||
| 144 (GPIO_492) | GPIO09 (AUDIO_MCLK) | 7 |  |
 |
8 | UART1_TX (/dev/ttyTHS0) | |
| GND | 9 |  |
 |
10 | UART1_RX (/dev/ttyTHS0) | ||
| 112 (GPIO_460) | UART1_RTS | 11 |  |
 |
12 | I2S0_SCLK | 50 (GPIO_398) |
| 122 (GPIO_470) | SPI1_SCK | 13 |  |
 |
14 | GND | |
| 85 (GPIO_433) | GPIO12 (PWM) | 15 |  |
 |
16 | SPI1_CS1 | 126 (GPIO_474) |
| 3.3V DC | 17 |  |
 |
18 | SPI1_CS0 | 125 (GPIO_473) | |
| 135 (GPIO_483) | SPI0_MOSI | 19 |  |
 |
20 | GND | |
| 134 (GPIO_482) | SPI0_MISO | 21 |  |
 |
22 | SPI1_MISO | 123 (GPIO_471) |
| 133 (GPIO_481) | SPI0_SCK | 23 |  |
 |
24 | SPI0_CS0 | 136 (GPIO_484) |
| GND | 25 |  |
 |
26 | SPI0_CS1 | 137 (GPIO_485) | |
| I2C0_SDA (I2C Bus 1) | 27 |  |
 |
28 | I2C0_SCL (I2C Bus 1) | ||
| 105 (GPIO_453) | GPIO01 | 29 |  |
 |
30 | GND | |
| 106 (GPIO_454) | GPIO11 | 31 |  |
 |
32 | GPIO07 (PWM) | 41 (GPIO_389) |
| 43 (GPIO_391) | GPIO13 (PWM) | 33 |  |
 |
34 | GND | |
| 53 (GPIO_401) | I2S0_FS | 35 |  |
 |
36 | UART1_CTS | 113 (GPIO_461) |
| 124 (GPIO_472) | SPI1_MOSI | 37 |  |
 |
38 | I2S0_SDIN | 52 (GPIO_400) |
| GND | 39 |  |
 |
40 | I2S0_SDOUT | 51 (GPIO_399) | |
GPIO
I2C
Checking I2C Buses
To list the I2C buses on the Jetson Orin Nano DevKit, use the following command:
sudo i2cdetect -l

i2c-0   i2c             3160000.i2c                             I2C adapter
i2c-1   i2c             c240000.i2c                             I2C adapter
i2c-2   i2c             3180000.i2c                             I2C adapter
i2c-4   i2c             Tegra BPMP I2C adapter                  I2C adapter
i2c-5   i2c             31b0000.i2c                             I2C adapter
i2c-7   i2c             c250000.i2c                             I2C adapter
i2c-9   i2c             i2c-2-mux (chan_id 1)                   I2C adapter
i2c-10  i2c             i2c-2-mux (chan_id 0)                   I2C adapter
i2c-11  i2c             NVIDIA SOC i2c adapter 0                I2C adapter
Jetson Orin Nano DevKit provides two I2C interfaces:
- I2C0: Connected to I2C Bus 1
- pin 27 (I2C0_SDA)
- pin 28 (I2C0_SCL)
- I2C1: Connected to I2C Bu7
- pin 3 (I2C1_SDA)
- Pin 5 (I2C1_SCL)
Detecting I2C Devices
To detect I2C slave addresses on I2C Bus 1:
sudo i2cdetect -y -r 1

     0  1  2  3  4  5  6  7  8  9  a  b  c  d  e  f
00:                         -- -- -- -- -- -- -- --
10: -- -- -- -- -- -- -- -- -- -- -- -- -- -- -- --
20: -- -- -- -- -- UU -- -- -- -- -- -- -- -- -- --
30: -- -- -- -- -- -- -- -- -- -- -- -- -- -- -- --
40: UU -- -- -- -- -- -- -- -- -- -- -- -- -- -- --
50: -- -- -- -- -- -- -- -- -- -- -- -- -- -- -- --
60: -- -- -- -- -- -- -- -- -- -- -- -- -- -- -- --
70: -- -- -- -- -- -- -- --
These are denoted as UU by i2cdetect
To detect I2C slave addresses on I2C Bus 7:
sudo i2cdetect -y -r 7

     0  1  2  3  4  5  6  7  8  9  a  b  c  d  e  f
00:                         -- -- -- -- -- -- 0e --
10: -- -- -- -- -- -- -- -- -- -- -- -- -- -- -- --
20: -- -- -- -- -- -- -- -- -- -- -- -- -- -- -- --
30: -- -- -- -- -- -- -- -- -- -- -- -- 3c -- -- --
40: -- -- -- -- -- -- -- -- -- -- -- -- -- -- -- --
50: -- -- -- -- -- -- -- -- -- -- -- -- -- -- -- --
60: -- -- -- -- -- -- -- -- -- -- -- -- -- -- -- --
70: -- -- -- -- -- -- -- --
In this example, devices are found at addresses 0x0E and 0x3C.
Summary
- The sudo i2cdetect -l command lists the available I2C buses.
- Pins for I2C0 and I2C1 are provided for connecting peripherals.
- Use sudo i2cdetect -y -r [bus number] to detect I2C devices on specific buses, with detected devices marked as UU or with their specific addresses like 0x0E and 0x3C.
Resources for Jetson Orin Nano
Image File:
- Update the firmware using an SD card: https://www.jetson-ai-lab.com/initial_setup_jon.html
- JetPack 5.1.3 for firmware update
- Jetson Orin Nano Developer Kit JetPack 6.0 GA image: r36_release_v3.0
- JetPack SDK 6.0: https://developer.nvidia.com/embedded/jetpack-sdk-60
Hardware Resources
- Jetson Orin Nano Developer Kit Documents
- Jetson Orin Nano Developer Kit Carrier Board Reference Design Files:
- Jetson Download Center: https://developer.nvidia.com/embedded/downloads
Online AI Resources:
- NVIDIA Jetson AI Lab: https://www.jetson-ai-lab.com/
- TensorFlow for JetPack 6.0: https://developer.download.nvidia.com/compute/redist/jp/v60/tensorflow/
- NVIDIA Github: https://github.com/NVIDIA
- AndreasKaratzas github: https://github.com/AndreasKaratzas/orin
- YahboomTechnology Jetson CUBE case: https://github.com/YahboomTechnology/Jetson-CUBE-case/tree/main
Add RTC Battery
On the bottom of the Jetson Orin Nano carrier board, J3 is an optional RTC (Real-Time Clock) backup battery connector designed to connect a CR1225 3V Lithium battery, providing power to the RTC module. Adding an RTC battery to the Nvidia Jetson Orin Nano development kit allows the system to maintain accurate timekeeping even when powered off.
Locate the RTC Connector (J3):
The RTC battery connector (J3) is on the bottom of the Jetson Orin Nano carrier board, as shown in Figure 2. A small arrow indicates pin 1 of J3, which connects to the positive battery terminal. According to the schematic, the R560 resistor must also be installed.
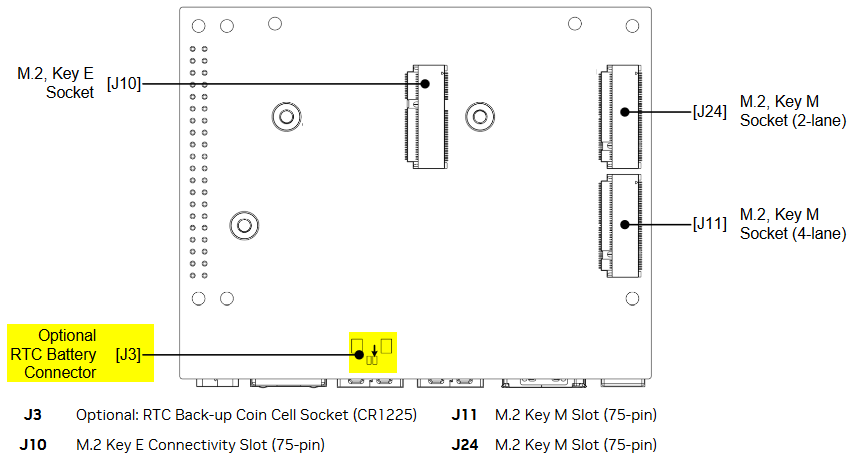
Figure 1: Jetson Orin Nano Carrier Board Placement — Bottom View
The connector used is a Wieson Technologies AC2651-0011-003-HH, 2-pin, 1.25 mm pitch connector, which may be difficult to source online. An alternative connector can be used at J3.
Install the Resistor (R560):
Solder a resistor (R560) to its designated position on the carrier board. This step is critical for ensuring proper current regulation.
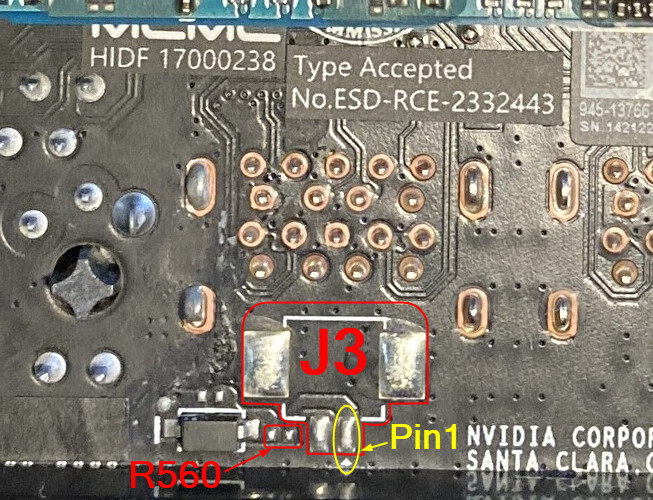
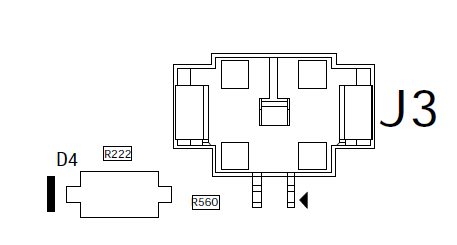
Figure 2: The Location of the J3 Connector and R560 Resistor
The schematic shows R560 as 1K ohm, which is too large when the D4 is installed on the board. Instead of 1K ohm, 560m ohm can be used. The resistor R222 is unnecessary when the D4 is mounted on the board.
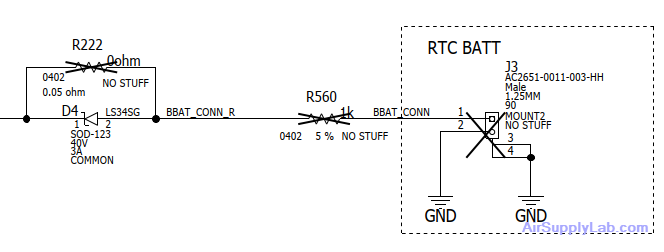
Figure 3: The Schematic Circuit for J3 RTC Backup Battery Connector
Components Needed:
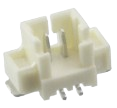 Connector Header: Molex 053398-0271, SMD 2-position, 1.25mm pitch. [DigiKey.com]
 Resistor: Panasonic ERJ2BQFR56X, 0.56 ohm 1% 1/6W 0402. [DigitKey.com]
 RTC Battery: CR2032 3V Lithium Battery with 2 Pin 2 Wire Cable and MOLES Connector. [Amazon.com]
The final soldering result is shown below:
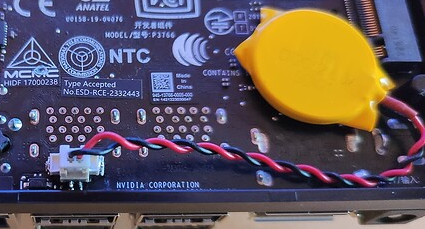
Figure 4: The J3 Connector with CR2032 battery
Power On and Test:
Reconnect the power supply and power on the Jetson Orin Nano. Set the system time and date, then power off and disconnect. Wait a few minutes and power it back to verify that the RTC retains the correct time and date.
- Modify the RTC Time:
sudo hwclock --set --date="07/14/2024 11:42:00" - Query the RTC time:
sudo hwclock -r - Update RTC time to system time
sudo hwclock -s - Query system time:
date