BCB Lesson 02: Interfacing x86 Assembly with C++Builder
Objective
This lesson aims to demonstrate how to integrate x86 assembly language with C++ code using C++Builder. It guides you through both methods—embedding inline assembly directly within C++ functions and creating separate assembly modules that can be linked with your C++ application. This approach enables developers to combine the efficiency and control of low-level assembly routines with the ease and structure of high-level C++ programming, optimizing performance for critical code sections while maintaining overall code manageability.
Overview
Programmers often write entire programs in assembly language for maximum control or performance, while others choose a high-level language for most of their work—using assembly only when necessary. Some developers even work primarily in assemblers but leverage high-level libraries when beneficial.
C++Builder is particularly versatile for mixed-language programming, offering three distinct ways to integrate C++ with assembly code. One of these methods is inline assembly, which lets you embed assembly instructions directly within a C++ function and compile them using Turbo Assembler (the default tool in C++Builder). Alternatively, you can write assembly code in separate modules compiled independently and linked with your C++ application.
2.1 Create a C++Builder Application with Assembler Code
Create a C++Builder Application
C++Builder supports various project types. The following instructions outline the steps to set up a new project — whether you're developing a Console Application or a Windows VCL Application.
Console Application
Console Application
<ol">
- Launch C++Builder:
Double-click the C++Builder icon to start the IDE.
 - Start a New Project:
- From the main menu, select File ➤ New ➤ Console Application - C++Builder.
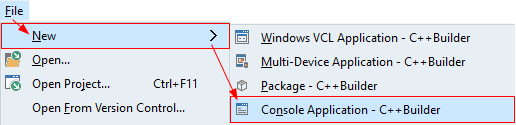
- Alternatively: Choose File ➤ New ➤ Other... ➤ C++Builder Projects, and select
 Console Application from the New Items dialog.
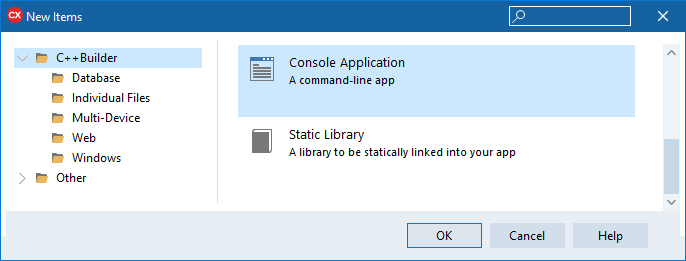
- From the main menu, select File ➤ New ➤ Console Application - C++Builder.
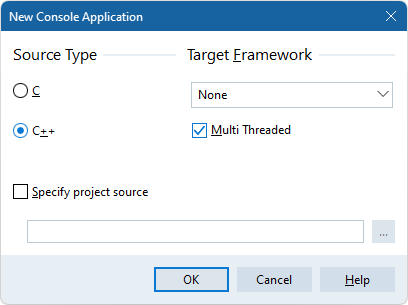
- Configure the Project:
- Choose the source type (C or C++) in the New Console Application dialog.
- If you already have a file containing a main() or winmain() functions, enable Specify project source to use it.
- For a C++ project requiring a graphics interface, select the desired application type in the Target Framework group:
- FireMonkey — for FireMonkey applications
- Visual Component Library — for VCL applications
- None — for a default framework
- Finalize and Save:
Click OK. The IDE will create a project file and open the Code Editor.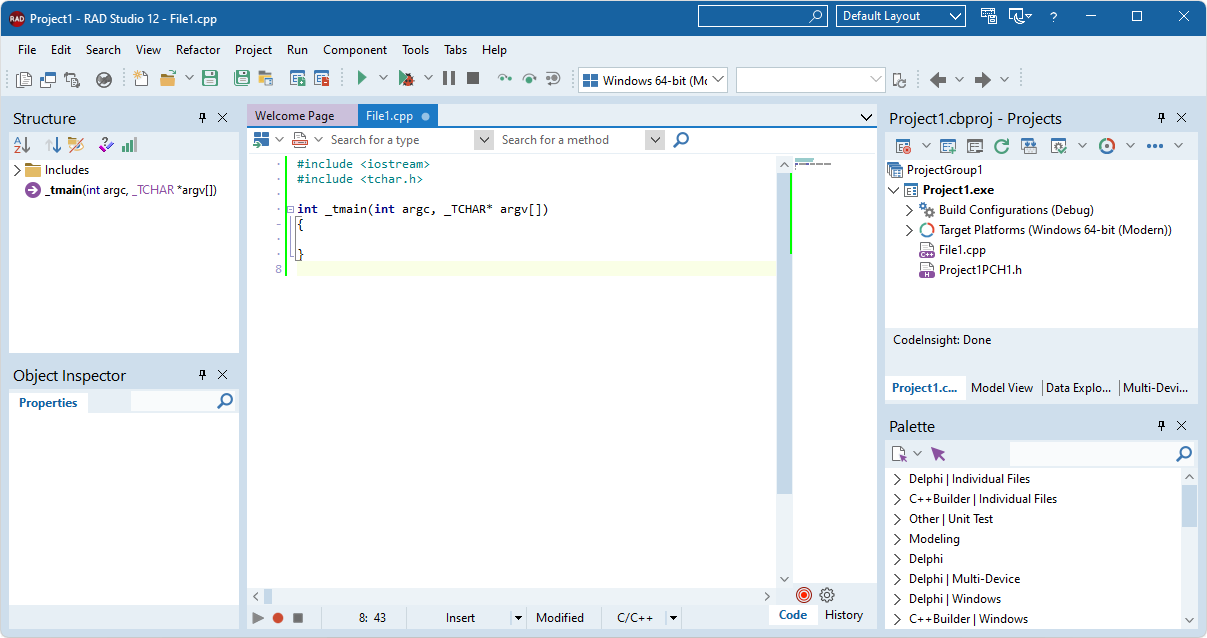
Then, select File ➤ Save All, create a new folder for your project, and save both the project and source files in that folder.
<span">
Windows VCL Application
Windows VCL Application
- Launch C++Builder:
Start the IDE by double-clicking the C++Builder icon. - Create a NEW VCL Project:
From the main menu, choose File ➤ New ➤ Windows VCL Application - C++Builder.
- Save Your Project:
Use File ➤ Save All to store your project files in a dedicated folder.
Configure Turbo Assembler Settings
After setting up your project, configure Turbo Assembler to handle your assembly code properly:
- Open Project Options:
Navigate to Project ➤ Options... to bring up the Project Options window. - Adjust Turbo Assembler Settings:
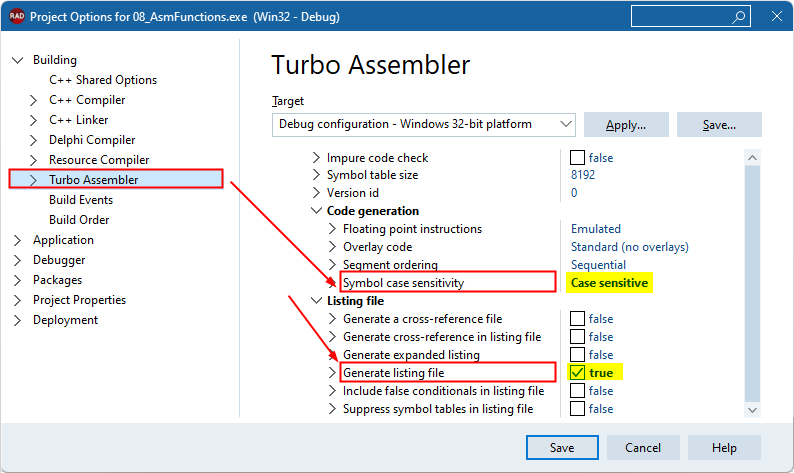
To integrate assembler code with C++ code, the Turbo Assembler must be set up to handle case-sensitive symbols and to generate listing files. You can achieve this using one of the following methods:- Method 1:
- Select Case Sensitive for the Symbol Case Sensitivity option in the Turbo Assembler settings.
- Check the Generate Listing File option.
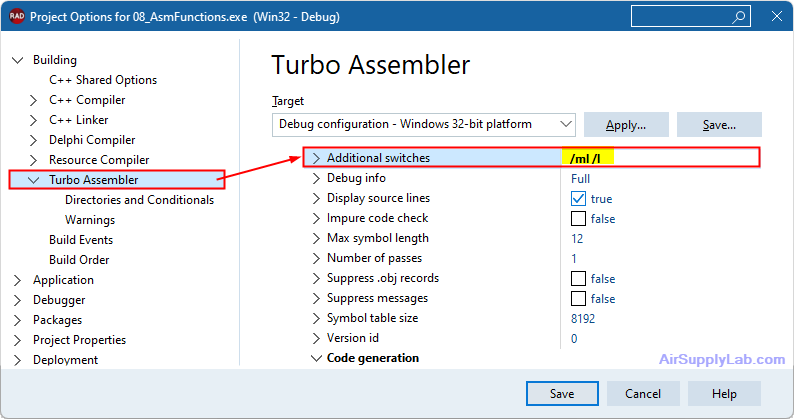
- Method 2:
- In the Turbo Assembler settings, find the Additional Switches field.
- Add the following switches:
- /ml: This switch instructs Turbo Assembler to treat symbol names as case-sensitive
- /l: This switch tells Turbo Assembler to generate a listing file
- Method 1:
The Template Code for Inline Assembler and Separate Assembly Code
Inline Assembler Code
Purpose: Embed assembly instructions directly within a C++ function. Ideal for small routines where tight integration is required.
How to use: Place the assembly code inside an __asm block directly in your C++ source file.
Example Instructions:
- Open your C++ source file.
- Insert an __asm block where needed.
- Write your assembly instructions within the block.
- Compile with C++Builder (which uses Turbo Assembler for the inline code).
Template Code Example:
#include <iostream>
using namespace std;

int main()
{
    int a = 10, b = 20, result = 0;

    __asm {
        mov eax, a      // Move variable 'a' into EAX
        add eax, b      // Add variable 'b' to EAX
        mov result, eax // Store the result
    }

    cout << "Result: " << result << endl;
    return 0;
}
Separate Assembly Code
Purpose: Write assembly routines in separate files compiled independently and then linked to your C++ application. Useful for larger or reused routines.
How to use: Create an assembly file (typically with a .asm extension), compile it using Turbo Assembler, and link the resulting object file with your C++ project.
Example Instructions:
- Write your assembly routine in a separate file (e.g., add.asm).
- Define the routine as public and link it with the C++ code.
- Compile the assembly file with Turbo Assembler to generate an object file.
- In your C++ file, declare the routine as extern "C" and call it usually.
- Link the object file with your C++ project.
Template Code Example:
Assembly file: add.asm
; Filename: add.asm
            .386
            .model flat, c
            .code
            public _AddNumbers
_AddNumbers proc                ; Assume parameters are passed on the stack
            mov eax, [esp+4]    ; First parameter
            add eax, [esp+8]    ; Second parameter
            ret
_AddNumbers endp
            end
C++ file: main.cpp
#include <iostream>
#pragma link "add.obj"

using namespace std;

extern "C" {
    int AddNumbers(int, int); // Link to the assembly routine
};

int main()
{
    int result = _AddNumbers(10, 20);
    cout << "Result: " << result << endl;

    return 0;
}
Benefits:
This method is particularly useful when you have more complex assembly routines, want to reuse assembly code across multiple projects, or prefer to keep your C++ and assembly code separate for better organization.
2.2 The framework of Assembler Modules
Memory Models
Turbo Assembler uses the .MODEL directive to define how code and data are organized in memory. The choice of model determines pointer sizes, segmentation, and the layout of both code and data. When interfacing with C++Builder code, the memory model in your assembly must match the expectations of the C++ run-time, ensuring proper data access and function calls.
The primary memory models include:
- .MODEL tiny
- .MODEL small
- .MODEL compact
- .MODEL medium
- .MODEL large
- .MODEL huge
Each model is designed for different program sizes and requirements.
Detailed Memory Model Descriptions
Detailed Memory Model Descriptions
.MODEL tiny
- Organization:
The entire program (code, data, and stack) resides in a "single 64KB segment". - Pointers:
All pointers (both code and data) are near (16-bit offsets) since they reference offsets within the same segment. - Segment Implications:
CS (Code Segment) and DS (Data Segment) point to the same physical segment, simplifying addressing since code and data share the same base address. - Usage:
Ideal for very small programs (typically .COM files) where size is extremely limited.
.MODEL small
- Organization:
The program is divided into two segments: one code segment and one data segment. - Pointers:
Both code and data pointers are near. - Segment Implications:
CS points to the code segment, while DS is initialized to point to the single data segment. This separation allows for slightly larger programs than the tiny model while maintaining simple pointer usage. - Usage:
- It is best suited for programs where neither the code nor the data exceeds 64KB.
- It is commonly used in small-to-moderate-sized applications.
.MODEL compact
- Organization:
One code segment and multiple data segments. - Pointers:
Code pointers are near, while data pointers are far (32-bit) since they might reference data in various segments. - Segment Implications:
CS remains fixed to the single code segment, while DS may need segment overrides or far pointers to access data residing in multiple segments. - Usage:
Chosen when the program’s code is small (fits in 64KB) but the global or static data exceeds 64KB.
.MODEL medium
- Organization:
Multiple code segments but one unified data segment. - Pointers:
Code pointers are far (to allow inter-segment calls), while data pointers are near. - Segment Implications:
CS may change across segments (requiring far calls), but DS is constant, ensuring straightforward data access. - Usage:
Used when the code size exceeds 64KB but the global/static data remains compact.
.MODEL large
- Organization:
Both code and data are divided into multiple segments. - Pointers:
Both code and data pointers are far. - Segment Implications:
CS changes as different code segments are called, and DS may require adjustments or segment overrides when accessing data across different segments. - Usage:
Appropriate for larger applications where both the code and the data segments exceed 64KB.
.MODEL huge
- Organization:
Similar to the large model, but with “normalized” far pointers that allow pointer arithmetic to be performed as if the data were contiguous. - Pointers:
Both code and data pointers are far, with added benefits for handling very large data structures. - Segment Implications:
CS functions like in the large model, while DS is managed in a way that abstracts the segmentation, easing pointer arithmetic across segments. - Usage:
It is best for applications requiring seamless access to large arrays or data structures spanning multiple segments.
When to Use Each Memory Model in Mixed C++/Assembly Projects
- Tiny Model:
Use for extremely small applications where code, data, and stack all fit within one 64KB segment. Typically used for .COM files. - Small Model:
Ideal for most conventional applications with less than 64KB of code and data. Simplifies pointer management (all pointers are near). - Compact Model:
Choose when the code is small but global data is large (exceeding 64KB). Requires far data pointers. - Medium Model:
It is best when the program’s code exceeds 64KB, but data remains within a single segment. Requires far code pointers for inter-segment calls while keeping data access simple. - Large Model:
Use when both code and data are too large to fit into single segments, necessitating far pointers for both. - Huge Model:
Select applications with very large, contiguous data arrays or structures requiring normalized far pointers for easier pointer arithmetic.
Integration Tip:
Always ensure that the memory model used in your Turbo Assembler modules is compatible with the expectations of your C++Builder project. Mismatches in pointer sizes or segment assumptions can lead to runtime errors.
Data Access: Global vs. Local Variables
Data Access: Global vs. Local Variables
Global Variables (Declared in C++ Code)
- Storage:
- Global (and static) variables declared in C++ code are typically allocated in the data segment pointed to by DS.
- Access via Assembly:
- In most models (small, medium, large, huge), the C++ run-time initializes DS to point to the data segment.
- Assembly code accesses these variables using DS-relative addressing.
- In models where data is segmented (compact, large, huge), extra care must be taken with far pointers or segment overrides.
Local Variables (Declared in C++ Code)
- Storage:
- Local variables are generally allocated on the stack (managed by the SS register) by the C++ run-time.
- Access via Assembly:
- Assembly routines that interface with C++ local variables must follow the correct calling convention and stack frame layout.
- Note:
- Although local variables are not directly accessed via DS, understanding their placement is important when writing mixed-language code that manipulates the stack.
CS and DS Segments
CS and DS Segments
CS (Code Segment)
- Role:
- Holds the executable code of the program.
- Usage:
- When switching between code segments, the CS register is automatically updated during far calls or returns.
- In the tiny model, CS is the same as DS; in other models, CS points exclusively to code.
- Implications for Integration:
- In all models, the C++ run-time ensures that CS is correctly set when a new code segment is entered.
- Assembly routines should respect the calling conventions regarding far or near calls when interfacing with C++ code.
DS (Data Segment)
- Role:
- Points to the segment where global, static, and constant data are stored.
- Usage:
- Assembly routines accessing global C++ variables rely on DS being properly initialized by the C++ run-time startup code.
- In models with multiple data segments (e.g., compact or large), you may need to use segment override prefixes to access data that is not in the default DS.
- Implications for Integration:
- DS remains constant in models where all data is in a single segment (tiny, small, medium).
- In models with multiple data segments (compact, large, huge), DS may require explicit segment overrides when accessing data not in the default segment.
Interplay in Different Models
- Tiny Model:
- CS and DS refer to the same physical segment, simplifying data access.
- Small and Medium Models:
- DS is fixed to a single data segment, while CS may change between code segments (medium) or remain constant (small).
- Large and Huge Models:
- CS and DS may refer to different segments, requiring careful management of far pointers and segment overrides.
Practical Integration Considerations with C++Builder
- Consistency is Key:
- Ensure that the memory model used in your assembly (.MODEL directive) is consistent with your C++Builder project settings. Mismatches can lead to pointer size errors or incorrect segment references.
- Segment Initialization:
- Trust the C++ run-time to initialize DS correctly for accessing global variables. Confirm that DS is valid when writing assembly routines before accessing C++ globals.
- Pointer Types:
- Be mindful of near vs. far pointers. Use the appropriate pointer type based on the memory model to avoid runtime errors.
- Calling Conventions:
- Follow the established calling conventions for both C++ and assembly to ensure that the stack and registers (especially CS and DS) are properly preserved and restored.
Turbo Assembler’s range of memory models — from tiny to huge — allows developers to tailor program structure according to code and data size. When working alongside C++Builder code:
- Global Data Access: Depends on the DS segment, which the C++ run-time must correctly set.
- Local Data: Managed on the stack and accessed via the SS register.
- CS vs. DS: The CS register is dedicated to code, while DS handles data. In simpler models (tiny/small), these segments may overlap or be straightforward, but in larger models, careful management of far pointers and segment overrides is required.
- Choosing a Memory Model:
- Use tiny for very small applications, small for moderate-size programs, compact or medium when one of code or data is larger, and large/huge for comprehensive applications where both code and data exceed 64KB.
This organized approach ensures smooth cooperation between Turbo Assembler routines and C++Builder–compiled C++ code, avoiding common pitfalls related to segmentation and pointer mismatches.
Publics and Externals
- PUBLIC Directive:
Declares a symbol (function or data) as available to other modules. For example, a PUBLIC function can be called from C/C++ or another assembler module. - EXTRN Directive:
Declares a symbol that is defined in another module. This is used when your module references data or functions from outside. - Naming Conventions:
When interfacing with C/C++ (using the C linkage specification), external symbols should begin with an underscore (e.g., _ToggleFlag, _Flag).
In addition, TASM’s simplified segment directives (like .MODEL, .DATA, .CODE, and .FARDATA) help generate C++‑compatible segments.
Example Code for Each Memory Model
.MODEL tiny
The entire program (code, data, and stack) resides in one 64‑KB segment in the tiny model. Because there is only one segment, the code and data share the same "segment register" — eliminating the need for segment overrides.
;------------------------------------------------------------
; TASM Example – Tiny Model with PUBLIC and EXTRN usage
; In the tiny model, code and data are in one segment.
; This example defines a public variable (_FlagT) and a public
; function (_ToggleFlagT) that toggles the flag.
;------------------------------------------------------------
            .386
            .MODEL  tiny

            .DATA
; Declare a flag variable that will be accessible to other modules.
; The PUBLIC directive exports _FlagT.
            PUBLIC  _FlagT
_FlagT      DB      0               ; 0 = reset, 1 = set

            .CODE
; Export the toggle function so it can be called externally.
            PUBLIC  _ToggleFlagT

_ToggleFlagT PROC
; Simple toggle routine: if flag is 0, set it to 1; else set it to 0.
            mov     al, _FlagT      ; Load the current flag value.
            cmp     al, 0
            jne     ToggleReset     ; If not zero, then reset flag.
            mov     al, 1
            mov     _FlagT, al      ; Set flag to 1.
            jmp     EndToggle

ToggleReset:
            mov     al, 0
            mov     _FlagT, al      ; Reset flag to 0.
EndToggle:
            ret
_ToggleFlagT ENDP

            END
.MODEL small
The program uses one code segment and one data segment in the small model. All pointers are near, and segment registers are set up automatically by the C/C++ runtime.
;------------------------------------------------------------
; TASM Example – Small Model with PUBLIC and EXTRN usage
; The small model uses one separate code and one data segment.
; This example defines a public variable (_FlagS) and a public
; function (_ToggleFlagS) that toggles the flag.
;------------------------------------------------------------
            .386
            .MODEL  small

            .DATA
; Export a flag variable. Its name is prefixed with an underscore for C linkage.
            PUBLIC  _FlagS
_FlagS      DB      0               ; Initial value: 0

            .CODE
; Export the toggle function.
            PUBLIC  _ToggleFlagS

_ToggleFlagS PROC
            push    bp
            mov   bp, sp
            ; Toggle the flag: if _FlagS is 0, set it to 1; else set to 0.
            mov     al, _FlagS
            cmp     al, 0
            jne     ResetFlag
            mov     al, 1
            mov     _FlagS, al
            jmp     DoneToggle
ResetFlag:
            mov     al, 0
            mov     _FlagS, al
DoneToggle:
            pop     bp
            ret
_ToggleFlagS ENDP

            END
.MODEL compact
In the compact model, the code is contained in a single code segment (near code), while data is spread over one or more far data segments. The .FARDATA directive is used to define far data.
;------------------------------------------------------------
; TASM Example – Compact Model with PUBLIC and EXTRN usage
; In the compact model, code is near and data is far.
; This example uses the .FARDATA directive to define a far data variable.
;------------------------------------------------------------
            .386
            .MODEL  compact

            .FARDATA
; Declare a far data variable (accessible across segments).
            PUBLIC  _FlagC
_FlagC      DB      0               ; Flag variable in far data

            .CODE
; Export the toggle function (near procedure).
            PUBLIC  _ToggleFlagC

_ToggleFlagC PROC
            ; In a 32-bit flat model, DS is already correct.
            ; Toggle the far flag: if _FlagC is 0, set it to 1; otherwise, set to 0.
            mov     al, BYTE PTR ds:[_FlagC]       ; Access far data (TASM sets proper segment overrides)
            cmp     al, 0
            jne     ResetFlagC
            mov     al, 1
            mov     BYTE PTR ds:[_FlagC], al
            jmp     EndToggleC

ResetFlagC:
            mov     al, 0
            mov     BYTE PTR ds:[_FlagC], al

EndToggleC:
            ret
_ToggleFlagC ENDP

            END
.MODEL medium
In the medium model, the code is spread over multiple far code segments, while data remains in one near data segment. (Code pointers are far; data pointers remain near.)
;------------------------------------------------------------
; TASM Example – Medium Model with PUBLIC and EXTRN usage
; In the medium model, data is in a single segment, but code may span
; multiple segments so functions must be declared as FAR.
;------------------------------------------------------------
            .386
            MASM
            .MODEL  medium

            .DATA
            ; Export a flag variable.
            PUBLIC  _FlagM
_FlagM      DB      0

            .CODE
            ; Export a far procedure.
            PUBLIC  _ToggleFlagM

_ToggleFlagM PROC   FAR
            push    ebp
            mov     ebp, esp

            ; Toggle the flag stored in the near data segment.
            mov     al, BYTE PTR ds:[_FlagM]
            cmp     al, 0
            jne     ResetFlagM
            mov     al, 1
            mov     BYTE PTR ds:[_FlagM], al
            jmp     EndToggleM

ResetFlagM:
            mov     al, 0
            mov     BYTE PTR ds:[_FlagM], al

EndToggleM:
            pop     ebp

            retn            ; Near return for a FAR procedure.

_ToggleFlagM ENDP

            END
.MODEL large
The large model uses multiple far code segments and multiple far data segments. Both code and data pointers are far. The .FARDATA directive is typically used for data.
;------------------------------------------------------------
; TASM Example – Large Model with PUBLIC and EXTRN usage
; In the large model, both code and data are far.
; This example defines a far data variable and a far procedure.
;------------------------------------------------------------
            .386
            MASM
            .MODEL  large

            .FARDATA
            ; Export a far data variable.
            PUBLIC  _FlagL
_FlagL      DB      0

            .CODE
            ; Export a far procedure.
            PUBLIC  _ToggleFlagL

_ToggleFlagL PROC   FAR
            push    bp
            mov     bp, sp
            ; Toggle the far flag.
            mov     al, BYTE PTR ds:[_FlagL]
            cmp     al, 0
            jne     ResetFlagL
            mov     al, 1
            mov     BYTE PTR ds:[_FlagL], al
            jmp     EndToggleL

ResetFlagL:
            mov     al, 0
            mov     BYTE PTR ds:[_FlagL], al

EndToggleL:
            pop     bp

            retn         ; Near return.
_ToggleFlagL ENDP

            END
.MODEL huge
The huge model is similar to the large model but provides “normalized” far pointers to handle very large data arrays that span segments. In the huge model each module has its own far data segment rather than sharing a common DGROUP. Also note that DS must be preserved and restored.
;------------------------------------------------------------
; TASM Example – Huge Model with PUBLIC and EXTRN usage
; In the huge model, both code and data are far, and each module’s data is
; accessed using normalized far pointers.
;------------------------------------------------------------
            .386
            MASM
            .MODEL  huge

            .FARDATA
            ; Export a far data variable.
            PUBLIC  _FlagH
_FlagH      DB      0

            .CODE
            ; Export a far procedure.
            PUBLIC  _ToggleFlagH

_ToggleFlagH PROC FAR
            ; In the huge model, DS may not point to the module’s far data by default.
            push    ds             ; Preserve DS as required by Borland C++ conventions.
            push    bp
            mov     bp, sp
            ; Toggle the flag in the far data segment.
            mov     al, BYTE PTR ds:[_FlagH]
            cmp     al, 0
            jne     ResetFlagH
            mov     al, 1
            mov     BYTE PTR ds:[_FlagH], al
            jmp     EndToggleH

ResetFlagH:
            mov     al, 0
            mov     BYTE PTR ds:[_FlagH], al

EndToggleH:
            pop     bp
            pop     ds          ; Restore DS.
            retn                ; Near return.
_ToggleFlagH ENDP

            END
Parameter Passing
Preserving Registers
Return Values
2.3 Calling Assembler Function from C++
Calling an assembler function from C++ involves writing your assembly routine in a separate module with the correct memory model, stack frame setup, and naming conventions to link properly with your C++ code. In C++, you declare the external assembly function using an extern "C" block to prevent name mangling, then compile and link both modules together. This approach allows you to leverage low-level assembly optimizations while maintaining the high-level structure of your C++ application.
Choose Your Integration Method
There are two common ways to mix C++ and assembler code:
- Inline Assembly:
Embed assembly instructions directly in your C++ code (supported by many compilers, including Borland C++). - Separate Assembly Module:
Write the assembler code in a separate file (e.g., using Turbo Assembler), then compile and link it with your C++ code. This method fully controls low-level details such as segment handling and parameter passing.
Call an inline Assembly Function
C++Builder lets you embed assembly instructions directly inside your C/C++ functions using the __asm (or asm) keyword. This method allows you to:
- Directly control machine instructions for performance-critical or hardware-specific tasks.
- Access processor-specific features that aren’t available in standard C/C++.
Embedding Inline Assembly in a C/C++ Function
Below is an example that shows how to add two 32-bit integers using Turbo Assembler inline assembly in a C++Builder program. Detailed comments explain each step.
#include <iostream>
using namespace std;

// Global variable example: accessible to inline assembly in the same translation unit.
int globalMultiplier = 2;

// Function using inline assembly to add two integers.
// It also multiplies the result by a global variable.
int inlineAsmAddMultiply(int a, int b)
{
    int result;  // Local variable to store the final result

    /*
       The asm block below uses C++Builder inline assembly syntax.
       Turbo Assembler lets you reference C/C++ variables directly by name.
       On a 32-bit system:
         - Local parameters and variables are accessed by their names.
         - C++Builder automatically handles the function prologue/epilogue.
    */
    __asm {
        // Load the first parameter 'a' into the EAX register.
        mov eax, a       // EAX now holds the value of 'a'

        // Add the second parameter 'b' to EAX.
        add eax, b       // EAX now equals (a + b)

        // Multiply the sum by the global variable 'globalMultiplier'.
        // Note: global variables are accessible directly by name.
        imul eax, globalMultiplier  // EAX = (a + b) * globalMultiplier

        // Store the result back into the local variable 'result'.
        mov result, eax  // result now holds the computed value
    }

    // Return the computed result.
    return result;
}

int main()
{
    int x = 10;
    int y = 20;

    // Call the function that uses inline assembly.
    int finalResult = inlineAsmAddMultiply(x, y);
    // Output the final result.
    cout << "Result = " << finalResult << endl;
    return 0;
}
Detailed Explanation of the Code
- Global Variable Access:
The global variable globalMultiplier is declared outside of any function. Inline assembly in C++Builder can refer to it by name directly. - Local Variables and Parameters: The parameters a and b and the local variable result are accessed by name. The inline assembly block does not need to worry about stack offsets because C++Builder resolves variable names for you.
- Assembly Instructions:
- mov eax, a: loads the value of a into the register EAX.
- add eax, b: adds the value of b to EAX.
- imul eax, globalMultiplier: multiplies the sum in EAX by the value of globalMultiplier.
- mov result, eax: stores the computed value from EAX into the C++ variable result.
- Integration with C/C++:
The asm block is embedded directly inside the function, making mixing high-level C/C++ logic with low-level assembly easy.
Separate Assembly Module
In this approach, you write your low-level, performance-critical code in an assembly (.asm) file. You then assemble and link this module with your C++Builder project. The C++ code calls the exported assembler functions using extern "C" declarations to prevent name mangling.
Assembly Module Structure
A typical assembly module for use with C++Builder includes:
- A MODEL directive that sets the memory model and calling convention (commonly flat and C-compatible for 32-bit code).
- A .DATA segment where you can declare global variables (or mark external C++ globals with EXTRN).
- A .CODE segment where you define the exported functions.
- Use of the PUBLIC directive to export functions so the linker can resolve calls from C++.
Example Assembly Module (MyAsmModule.asm)
Below are two example functions:
- Call-by-Value Example: A function that adds two 32-bit integers.
- Call-by-Pointer Example: A function that increments an integer via a pointer.
- Global Variable Access: How to access a global variable declared in assembly and one declared in C++.
;------------------------------------------------------------
; MyAsmModule.asm
; This module is assembled separately and linked with a C++Builder project.
; It uses the flat memory model and C calling conventions.
;------------------------------------------------------------
                .386
                .MODEL  small

                .DATA
; Global variable defined in assembly
                PUBLIC  _globalAsmVar
_globalAsmVar   DWORD   100             ; Initialize global assembly variable to 100

                .CODE

;------------------------------------------------------------
; Function: _AsmAdd
; Purpose: Adds two integers passed by value.
; Parameters (by value):
;   [ebp+8]  - First integer (a)
;   [ebp+12] - Second integer (b)
; Returns:
;   Sum of a and b in EAX.
;------------------------------------------------------------
                PUBLIC  _AsmAdd

_AsmAdd         PROC
                push    ebp             ; Standard function prologue: save base pointer
                mov     ebp, esp        ; Set new base pointer for this stack frame

                ; Load parameters from the stack:
                mov     eax, [ebp+8]    ; EAX = a (first parameter)
                add     eax, [ebp+12]   ; EAX = a + b (second parameter added)

                pop     ebp             ; Restore original base pointer
                ret                     ; Return to caller; result is in EAX
_AsmAdd         ENDP

;------------------------------------------------------------
; Function: _IncrementValue
; Purpose: Increments an integer via pointer (call-by-pointer).
; Parameter:
;   [ebp+8] - Pointer to a 32-bit integer.
; Operation:
;   Dereferences the pointer and increments the integer.
;------------------------------------------------------------
                PUBLIC _IncrementValue

_IncrementValue PROC
                push    ebp             ; Save base pointer
                mov     ebp, esp        ; Set stack frame

                mov     eax, [ebp+8]    ; Get pointer to integer from parameter
                ; Increment the integer value pointed to by EAX:
                inc     dword ptr [eax]

                pop     ebp             ; Restore base pointer
                ret                     ; Return (no explicit result)
_IncrementValue ENDP

;------------------------------------------------------------
; Function: _AsmUseCppGlobal
; Purpose: Demonstrates accessing a global variable defined in C++.
; Note: The global variable is declared in C++ and referenced here.
;------------------------------------------------------------
                EXTRN   _globalCppVar:DWORD     ; Declare external global variable (from C++)

                PUBLIC  _AsmUseCppGlobal

_AsmUseCppGlobal    PROC
                push    ebp
                mov     ebp, esp

                ; For example, add 50 to the C++ global variable:
                mov     eax, DWORD PTR DS:[_globalCppVar]       ; Read the 32-bit value from DS
                add     eax, 50                                 ; Add 50
                mov     DWORD PTR DS:[_globalCppVar], eax       ; Write the new value back

                pop     ebp
                ret
_AsmUseCppGlobal ENDP

                END